Disclosure: This post may contain affiliate links, which means I may earn a commission if you click on the link and make a purchase.
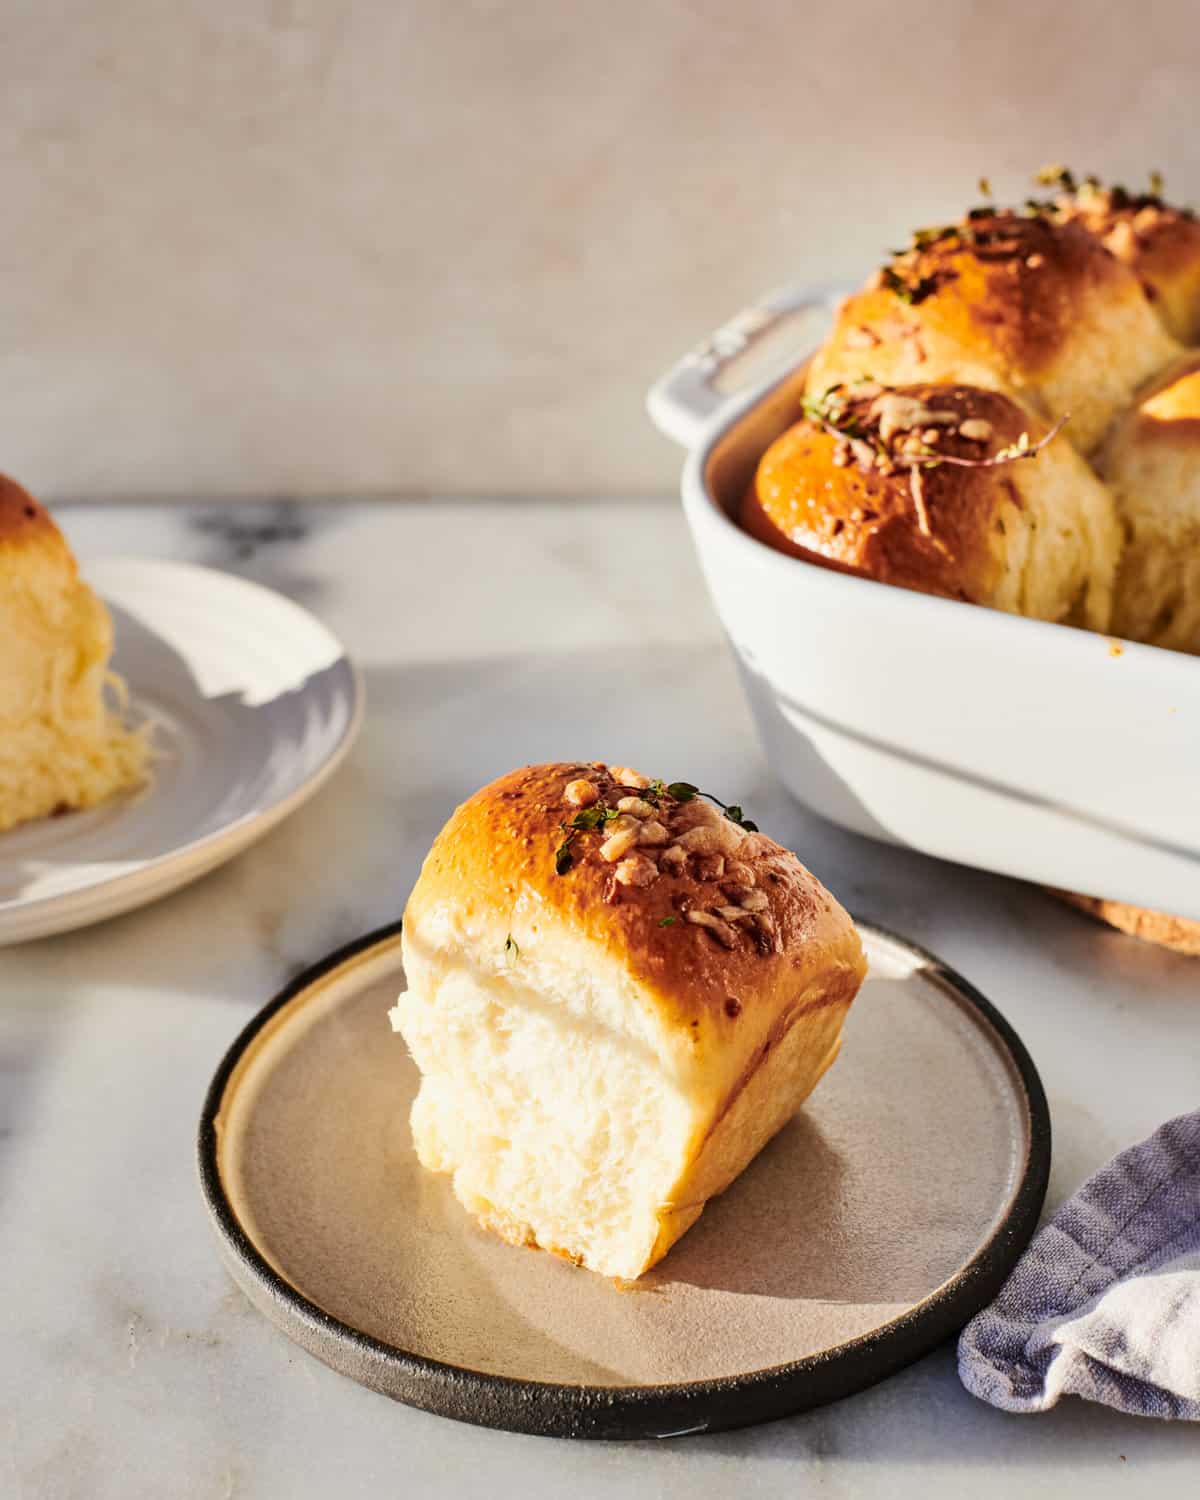
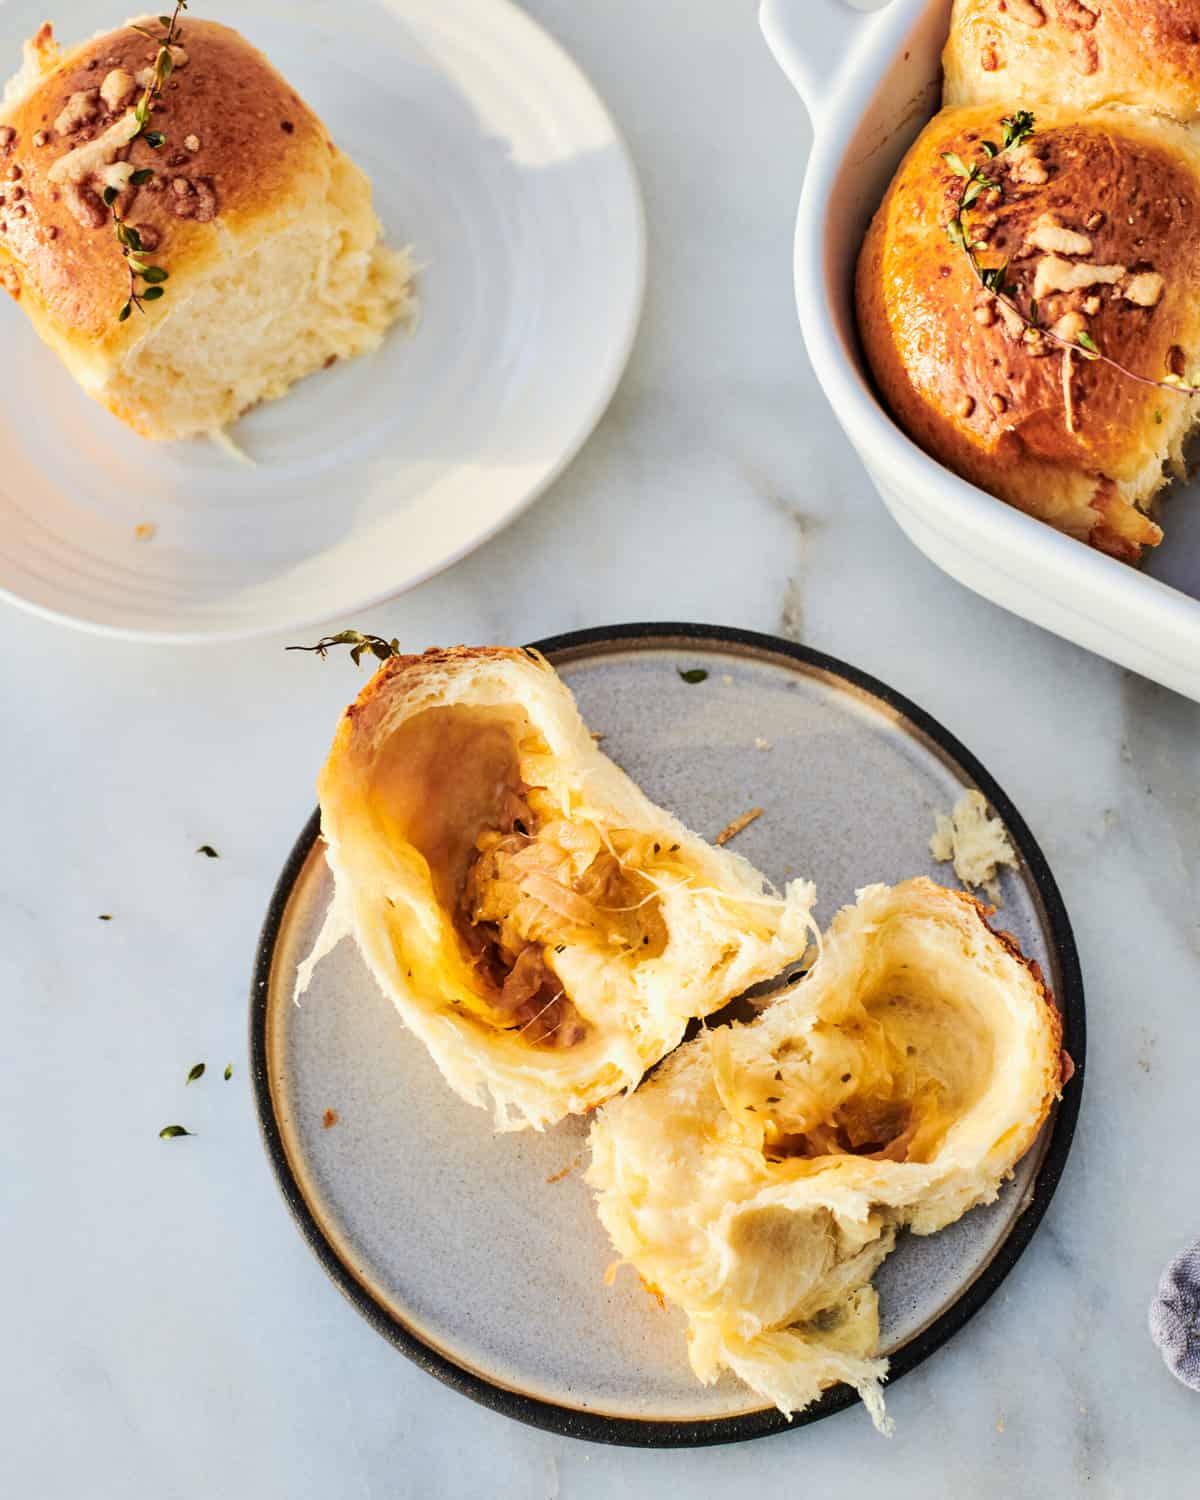
These French Onion Rolls are fluffy on the outside and filled with sweet, caramelized onions and melty gruyere cheese on the inside. They are reminiscent of a classic french onion soup and each bite is packed with flavor.

I Love Dinner Rolls
At this point, I’ve made my fair-share of rolls. The most iconic rolls on this site are by far my Salted Honey Parker House Rolls. They are divine. I also have these Everything Parker House Rolls, Garlic Dinner Rolls and now, these delicious French Onion Rolls.
I love all of them; it really just depends what flavor profile you’re in the mood for.
Ingredients You’ll Need for these Rolls
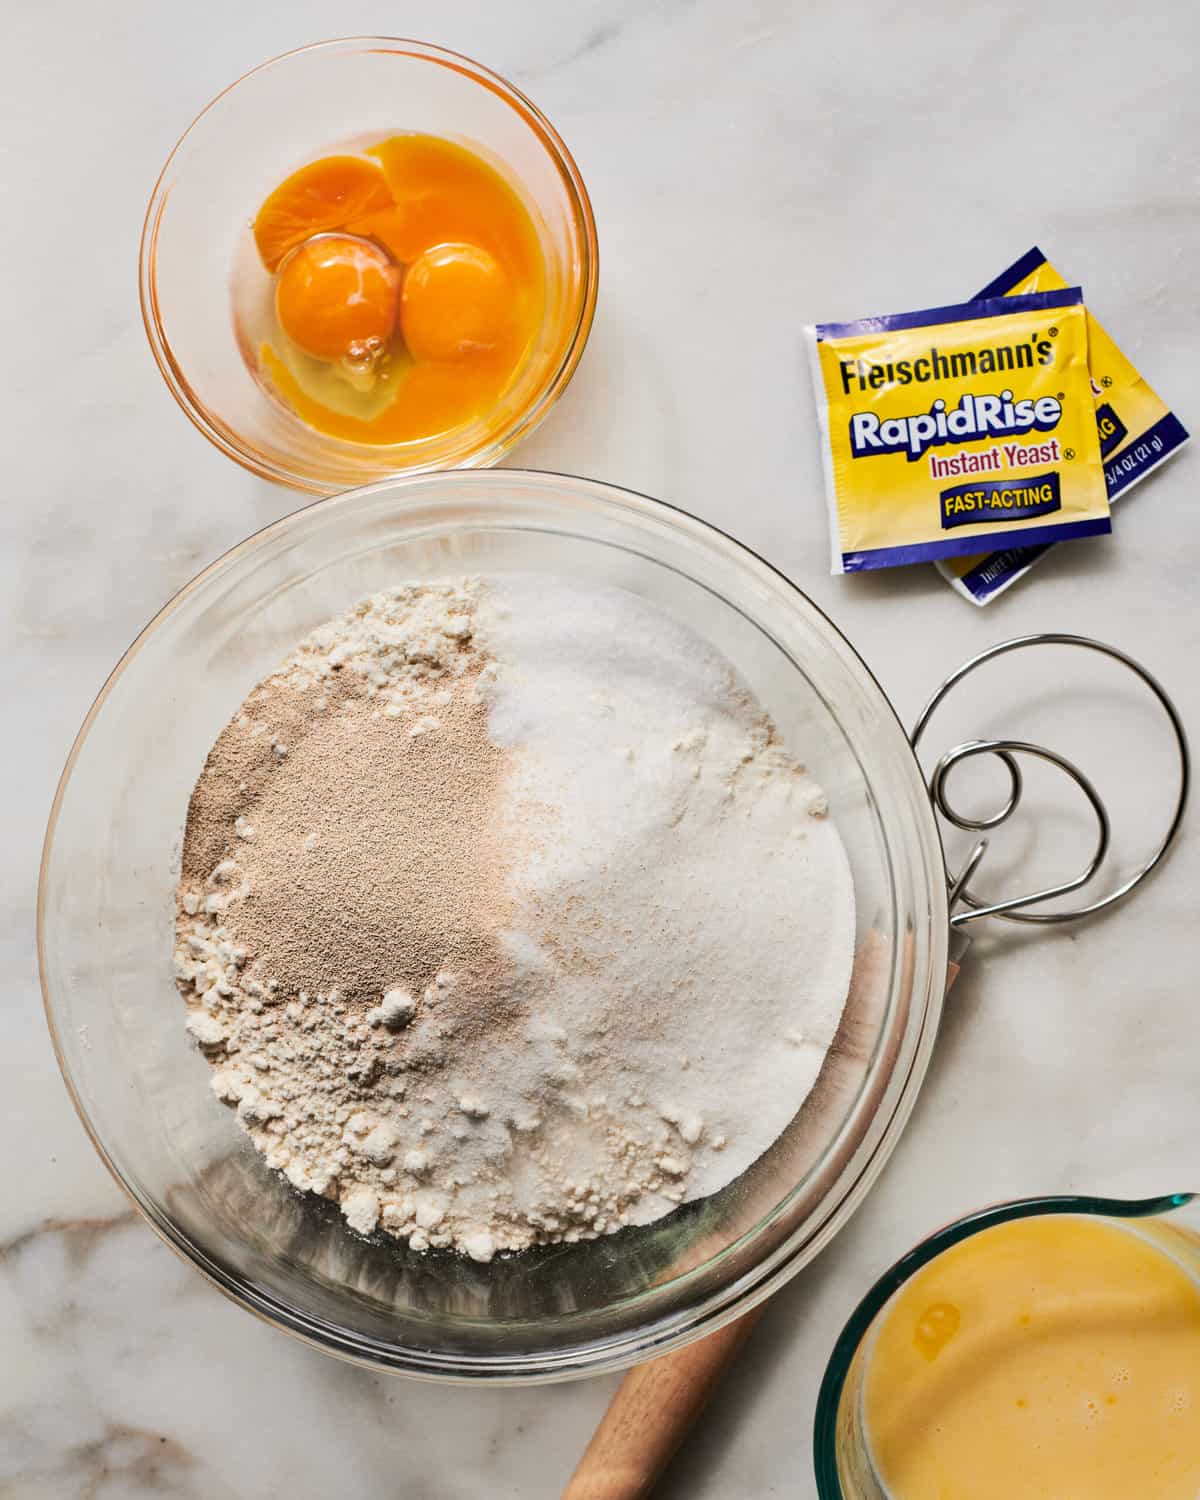
- Eggs – These add a richness to the dough that I just love.
- Instant Yeast – My favorite yeast of choice because it goes into the dry ingredients and makes making dinner rolls very easy.
- Melted Butter – This gives the dough a nice suppleness.
- Gruyére Cheese – Flavorful cheese that is a little funky and melty.
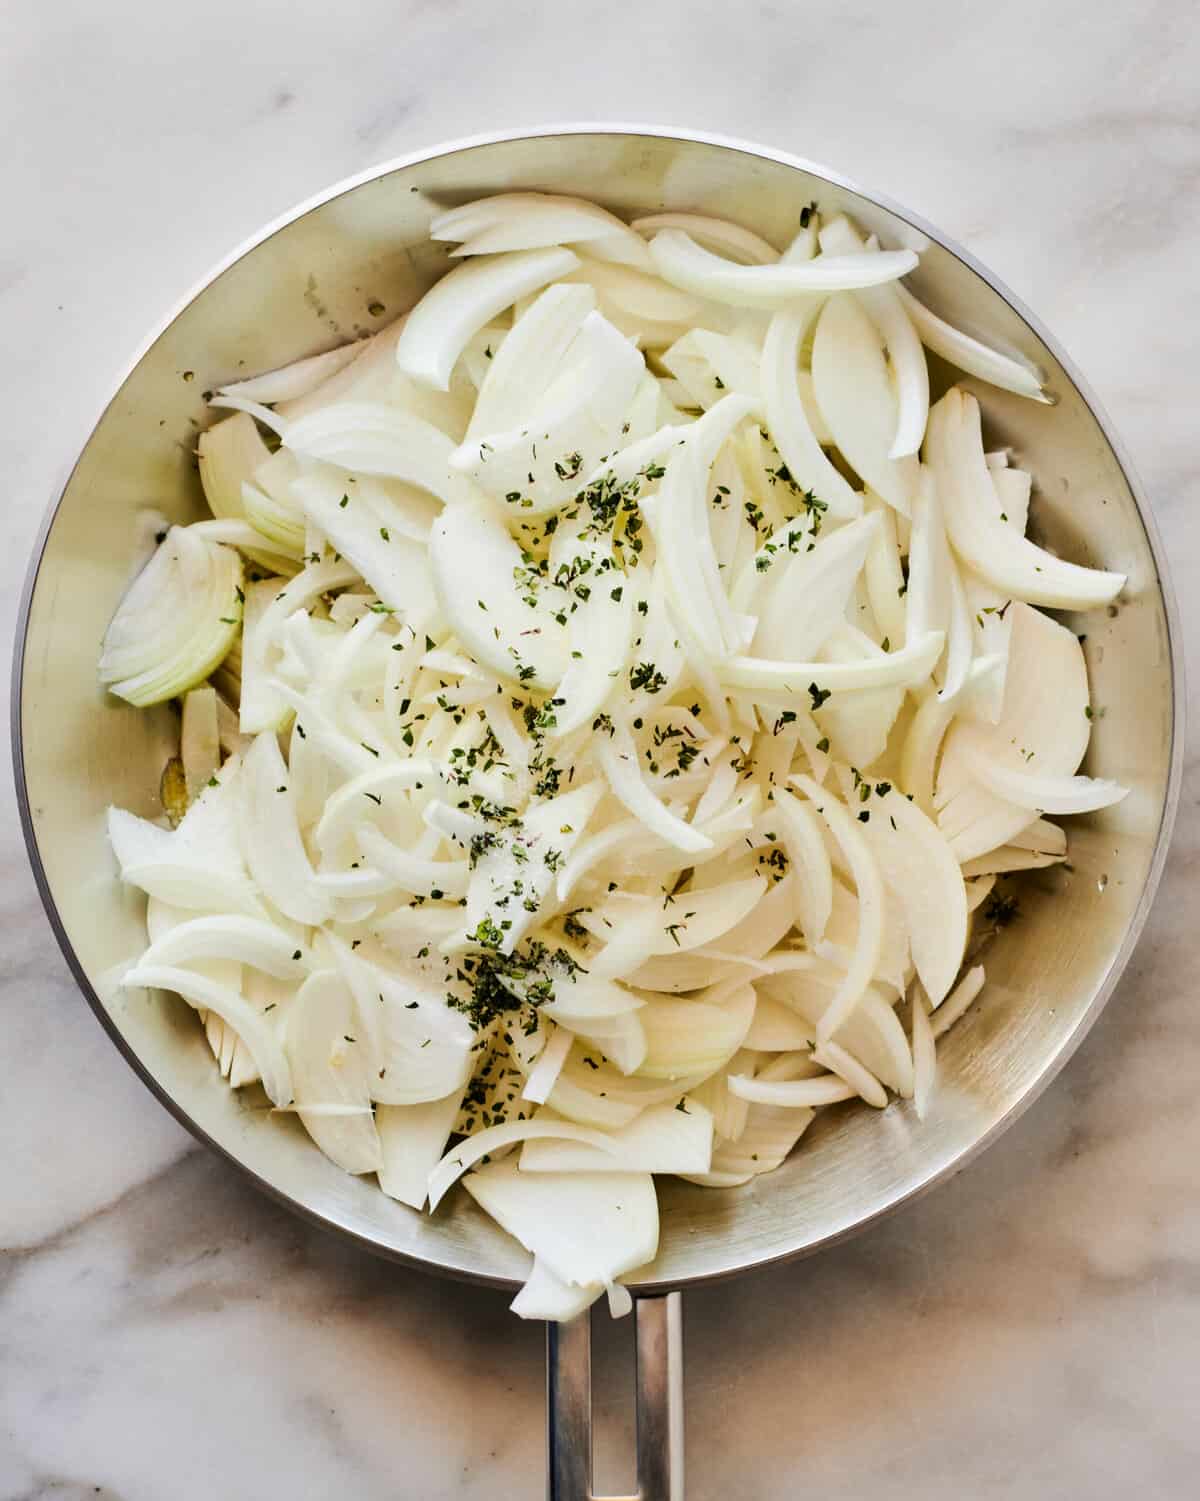
- Onions – I love caramelized onions. They are unmatched. See the instructions below on my tips on how to caramelize onions as quick as possible.
For the rest of the ingredients, please see the recipe card below!
How to Caramelize Onions Easily
- Slice them thinly – I thinly slice my onions from root to tip and find this makes for the most uniform slices.
- Cook them covered first – I like to start by cooking them in a pan that’s covered. This sweats them and they’ll be releasing their water quickly.
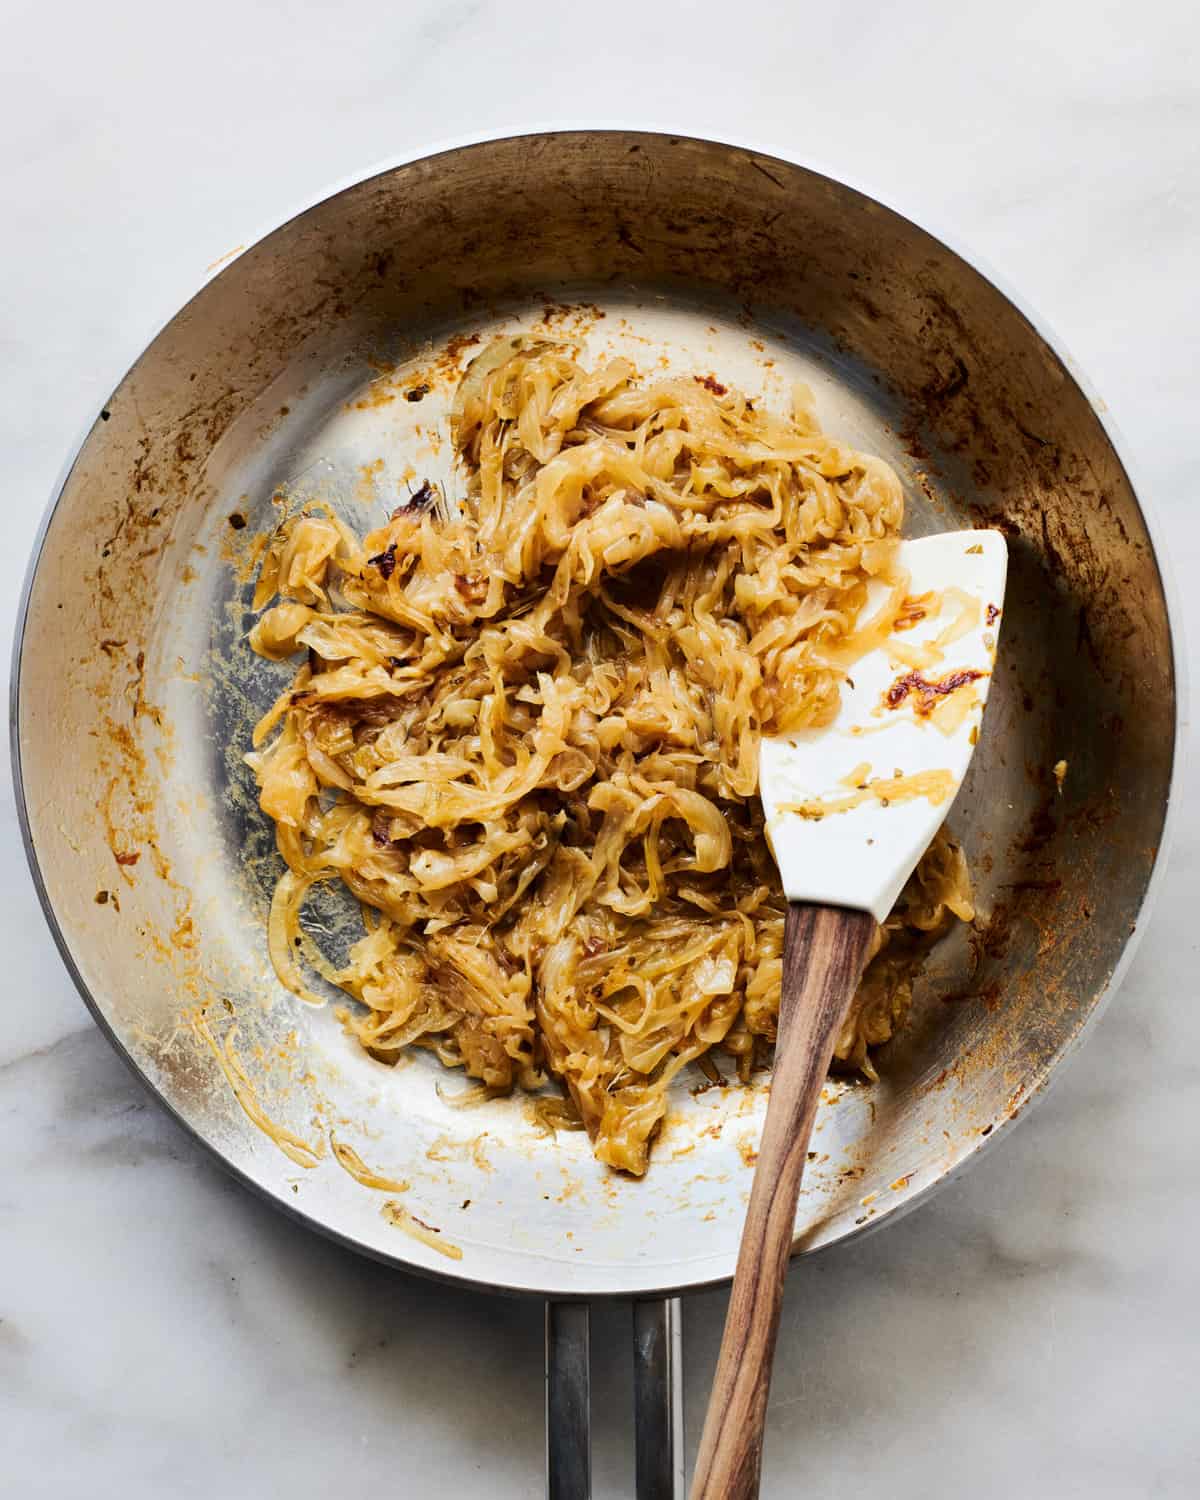
- Cook them uncovered – After they sweat out their water, I like to cook them uncovered. This is where the magic happens.
Flavors In These Rolls
When I think of melty cheese, gruyere is the first cheese to come to mind. It has a really high water-to-oil ratio which means that it melts evenly rather than getting oily. That’s what makes it the ultimate cheese to stuff your French Onion Rolls with.
How to Make French Onion Rolls
- Make the dough by mixing the flour, granulated sugar, yeast, and kosher salt then mix in warm milk and butter. Next mix in the egg and egg yolks and mix until everything has been incorporated. Now time to knead your dough until it’s smooth. Transfer the dough to a bowl that has been oiled and cover it with a kitchen towel so it can rise for around 40 minutes.
- Caramelize your onions by melting butter and oil in a pan set over medium heat. Add your onions and season with salt. Stir to coat in the butter and add a tablespoon or two of water to the pan before covering it for 15 minutes. Remove the lid and cook the onions for 25 to 45 minutes, stirring often, or until golden brown and caramelized.
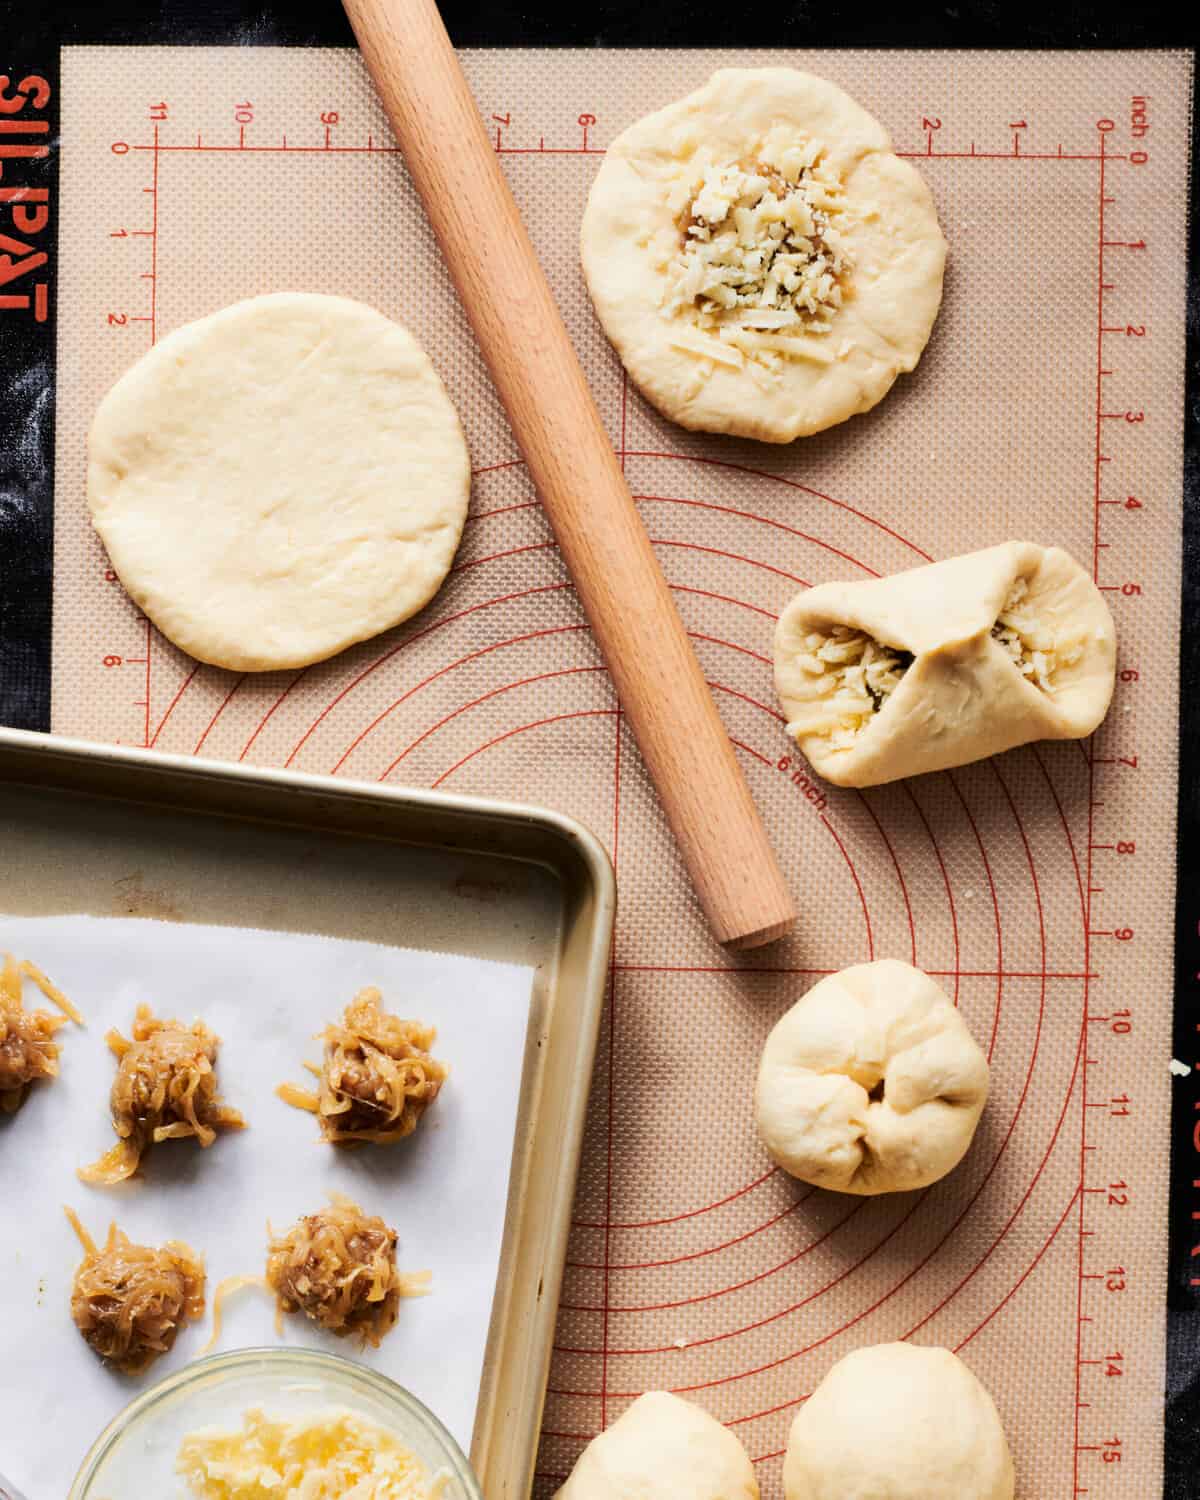
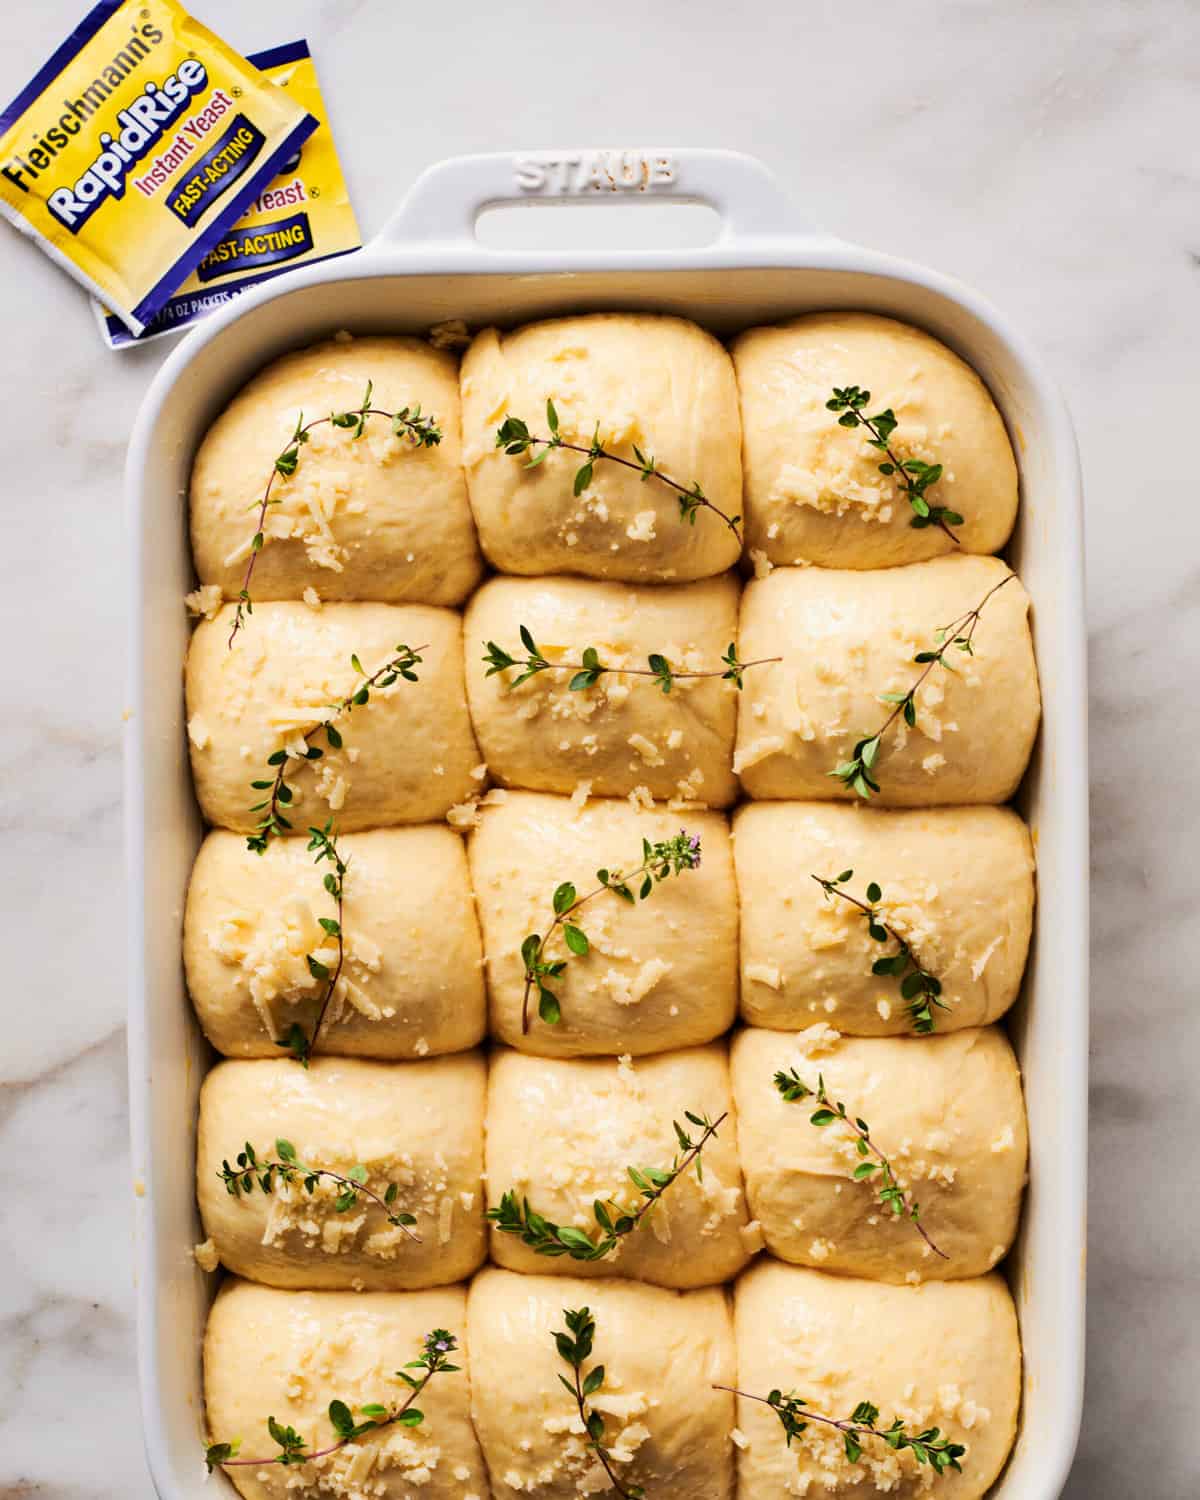
- To assemble your rolls, divide the dough into 15 equal pieces. Roll out one portion of dough into a flattened round and place ½ tablespoon of caramelized onion and ½ tablespoon of grated gruyere in the middle. Pull the ends into the middle and pinch them together to close. Place the ball in the pan and repeat with the remaining pieces. Once all balls have been filled, cover the pan with a kitchen towel and let it proof until doubled in size.
- Brush the tops with an egg wash, sprinkle with the remaining cheese, top with a fresh sprig of thyme, and bake for 28 to 30 minutes.
Recipe FAQs
If your fingers are sticking to the dough, you can just lightly grease them with some olive oil and it’ll be stick-free!
You can use kosher salt or skip it all together.
If you don’t have instant yeast, you can use active dry yeast by adding the active dry yeast to the warm milk (don’t add the butter yet). Allow it to bloom and activate and get all foamy, for about 10 minutes, then mix in the melted butter.
To make these ahead, you can make the dough the night before and let it rise in the fridge overnight. The following morning, divide and assemble the rolls, let them rise, and bake.
Recipe Tip
- Stir the onions regularly – This will make it so they don’t burn easily. They will need some babysitting.
- Set dough in a warm place – Be sure you’re rising the dough in a warm place near your oven. As we get into cooler months, you want to make sure you’re rising the dough in a non-drafty part of your home.
- How to store these rolls – These rolls are best stored in a resealable plastic bag at room temperature.
- How to rewarm rolls – To rewarm them, wrap them in foil in a 200 degrees F oven for 10 minutes. You can serve them with softened butter or drizzle them with more melted butter before serving.
- Jarred yeast – If you’re not using the package of instant yeast and instead have a jar, you’ll be using 14 grams total of instant yeast. (Each envelope weighs 7 grams.)
- No dough crust – Be sure to wrap the bowl tightly with plastic wrap if letting it rise in the fridge overnight or else the dough could form a crust. These are best on the day of.
What to Serve with these French Onion Rolls

If you tried this French Onion Rolls recipe or any other recipe on my website, please leave a 🌟 star rating and let me know how it went in the 📝 comments below. Thanks for visiting!
French Onion Rolls

Equipment
Ingredients
Dough:
- 1 tablespoon unsalted butter, (for the baking pan)
- 4 1/2 cups all-purpose flour, (562 g)
- ¼ cup granulated sugar
- 2 envelopes Instant Yeast
- 2 teaspoons kosher salt
- 1 1/3 cup whole milk
- 1/4 cup unsalted butter, (melted)
- 1 large egg
- 2 large egg yolks
Caramelized Onions:
- 1 tablespoon unsalted butter
- 1 tablespoon olive oil
- 4 large sweet onions, peeled and thinly sliced, from root to end
- 1 teaspoon finely chopped fresh thyme
- 1 teaspoon kosher salt
Assembly:
- 6 ounces gruyére cheese, grated (grated through large holes of a box grater) and divided
- 1 large egg, (beaten, for egg wash topping)
- 15 sprigs of fresh thyme
Instructions
To Make the Dough:
- Butter a 9×13-inch baking pan or something comparable and set aside.
- *Note, this recipe uses a stand-up mixer but if you don’t have one, you can simply mix the ingredients together with a spatula and knead the dough by hand for about 10 minutes!
- In the bowl of a stand-up mixer (with the hook attachment), add the flour, granulated sugar, yeast, and kosher salt.
- Mix until combined. In a small pot, set over medium-low heat, warm the milk and butter, until butter is melted, being sure it’s not too hot (it should be lukewarm), or else the yeast won’t rise. If it does get a bit too hot, simply let it stand at room temperature until it cools down.
- Pour the liquid mixture into the dry ingredients. In a small bowl, add the egg and egg yolks and beat until combined. Next, add the egg mixture to the flour mixture and knead with the mixer on medium speed for about 5 to 7 minutes, until smooth and elastic.
- The dough will be quite wet and that’s ok! Rub a medium bowl with about a teaspoon of oil, (I used olive oil), and transfer the dough to the bowl. Cover with a clean kitchen towel and allow to rise for 30-40 minutes. Alternatively, cover the bowl with a lid or plastic wrap and allow it to rise in the fridge for 12 to 24 hours.
To Caramelize the Onions:
- Add the butter and oil to a wide-rimmed pan set over medium heat and heat until the butter is melted. Add the sliced onions, thyme, and season with the salt, and stir until they are completely coated in the butter mixture. Reduce the heat to medium-low, add a tablespoon or two of water and cover the pan for 15 minutes. This will help the onions soften.
- Remove the lid and stir every few minutes, until caramelized. This will take anywhere from about 25 to 45 minutes. Remove from the heat and transfer to a small bowl.
To Assemble:
- Divide the dough into 15 equal pieces. If you want them to be the same exact size, you can weigh them out. Each piece of dough should weigh around 70 grams.
- Divide the caramelized onions into 15 equal portions (around 1 packed ½ tablespoon). Using half of the grated gruyere cheese, top each portion of caramelized onions with about a ½ tablespoon or so of cheese.
- Roll out one portion of dough into a thin pancake shape, and place a portion of the onion and cheese in the center. Bring all the edges together in the center, enclosing the onions and cheese, and pinch the ends together to make sure the ball is closed and secure. Place the ball, seam down, in the buttered pan and repeat with the remaining portions.
- Cover the pan with a clean dish towel and let it proof for about 1 to 1 1/2 hours. The rolls should have doubled in size and should be puffy and supple.
- *Note: if you let the dough rise in the fridge overnight, you can assemble them straight from the fridge but they may need to rise for a bit longer (since the dough will be quite cold). It may take about 1 1/2 hours for them to rise after being assembled!
- Preheat the oven to 350 degrees F. Brush the tops of the rolls with egg wash and sprinkle on the remaining 3 ounces of grated gruyere cheese. Top each roll with a sprig of fresh thyme and transfer the pan to the oven to bake until golden brown, about 25 to 30 minutes.
Notes
- To Store and Reheat these Rolls: You can store these rolls in a sealable plastic bag and store them at room temperature.
- To rewarm them, wrap them in foil in a 200 degrees F oven for 10 minutes. You can serve them with softened butter.
- Instructions on How to Use Active Dry Yeast (vs Instant Yeast):
If you don’t have instant yeast, you can use active dry yeast by adding the active dry yeast to the warm milk with a teaspoon of granulated sugar. Allow it to bloom and activate and get all foamy, for about 10 minutes, then mix in the melted butter and proceed with the recipe. - If Using Instant Yeast from a Jar (vs. packets):
If you’re not using the package of instant yeast and instead have a jar, you’ll be using 14 grams total of instant yeast. (Each envelope weighs 7 grams.) - To Make Ahead:
To make these ahead, you can make the dough the night before and let it rise in the fridge overnight. The following morning, divide and assemble the rolls, let the rolls rise until puffy (about 1 1/2 hours) and bake. - Avoiding a crust: Before you put the dough in the fridge to rise, be sure to rub the surface of the dough with a bit of olive oil or cooking oil.
And be sure to wrap the bowl tightly with plastic wrap if letting it rise in the fridge overnight or else the dough could form a crust. These are best the day of.
Nutrition
Nutrition information is automatically calculated, so should only be used as an approximation.


Beautiful. Can I freeze these? Even better vacuum seal freeze?
Yes, you can definitely freeze them. I’d say they’d be good for about 6 months in the freezer. 🙂 So glad you liked them!
Can you make these and then freeze them?
I make your salted honey Parker house rolls regularly and absolutely love them! I’ve been wanting to make a more savory version, so I’m going to make this dough (not stuffed with onions) and brush with garlic butter after baking. Seems like that should work ok!
oh yeah it should work great!
I made these today for my family’s Thanksgiving lunch. Everyone LOVED them and my family told me that they want them at every Thanksgiving from now on! I did all the prep and assembly at my house and then put the covered baking dish on my car floorboard and turned on the heater to help them with the second proof haha. It worked perfectly and they had doubled in size and were ready to go into the oven by the time I arrived at my parents’ house. I was running a little late but everyone said they were worth the wait 🙂
INCREDIBLE!! I love this. They rose while you drove lol. Love that.
I made these tonight and they were amazing! So good.
AMAZING!