Disclosure: This post may contain affiliate links, which means I may earn a commission if you click on the link and make a purchase.
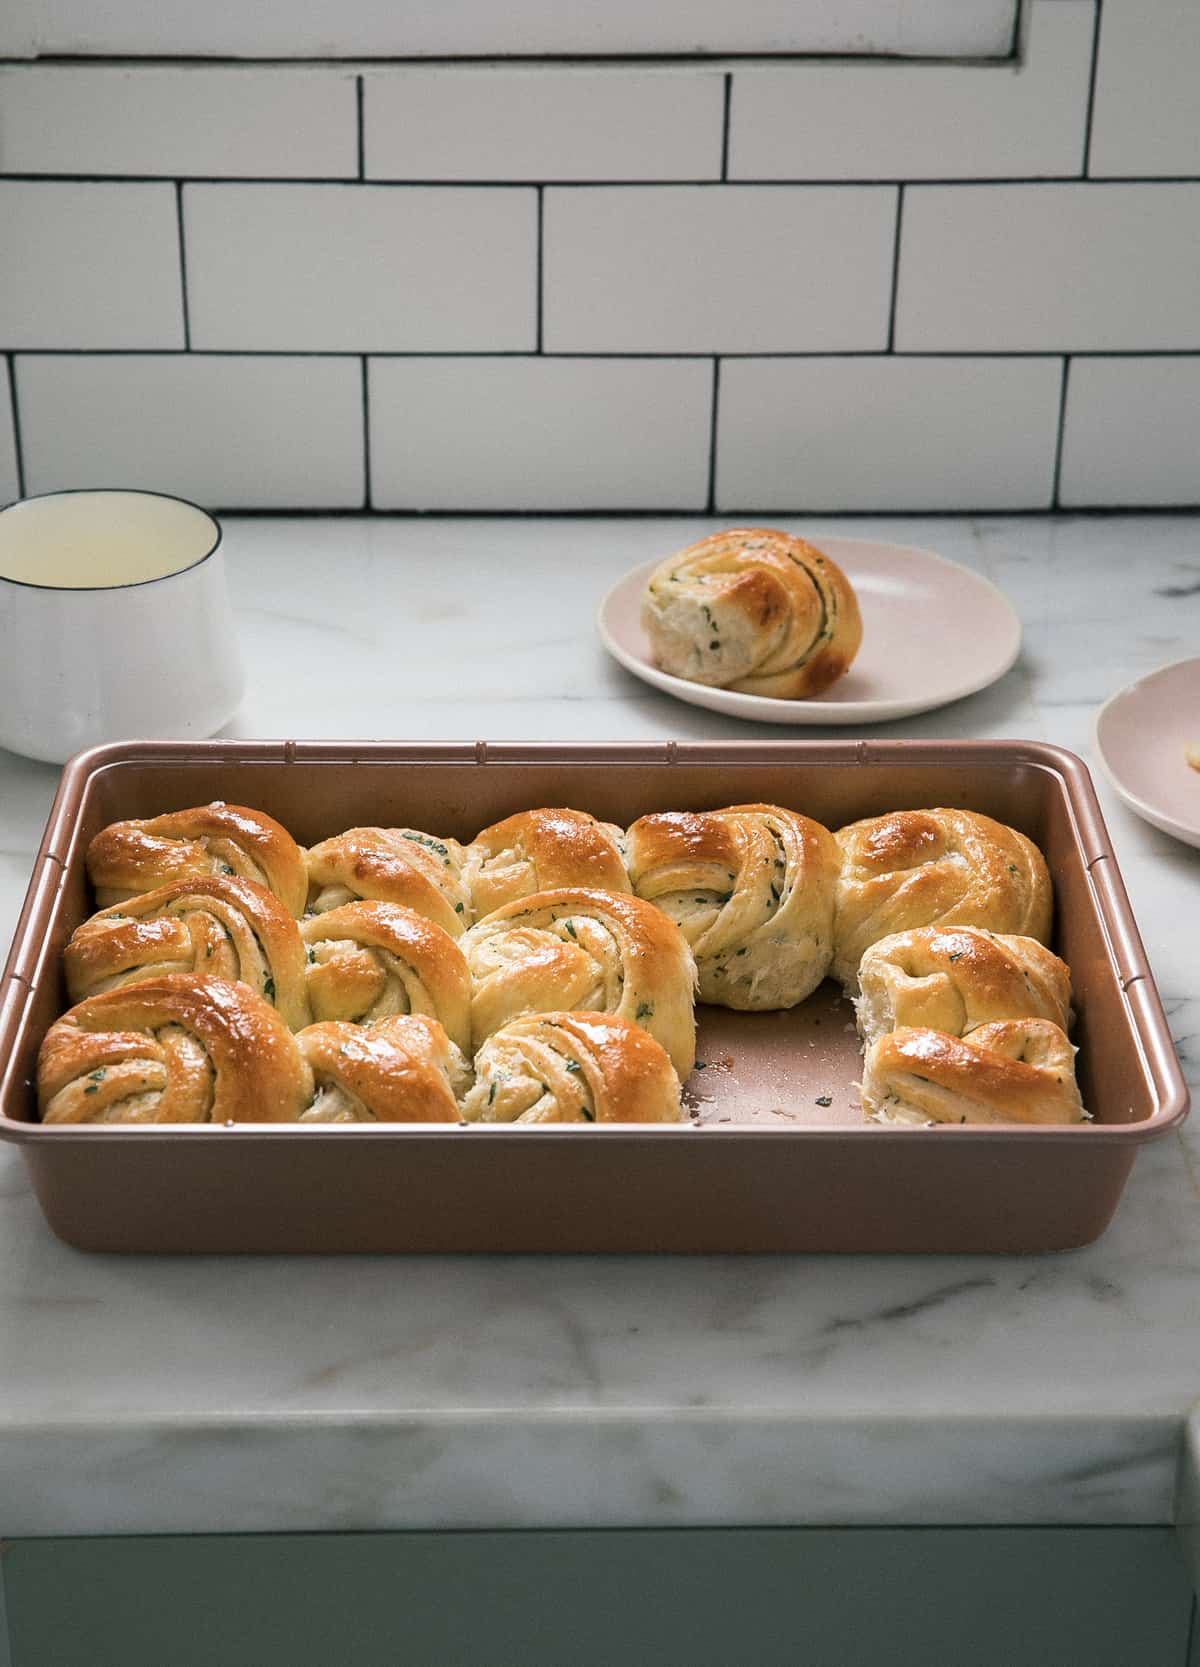
These Garlic Dinner Rolls are garlicky, buttery, and fluffy. Each bite has loads of garlic, parsley, and butter flavor twisted into it. And after they’re baked up to puffy perfection, they are brushed with butter and sprinkled with flakey salt. Pair these with this Zuni-Style Pollo a la Brasa Chicken and a Cranberry Margarita.
Why You Should Make These Rolls
I love making bread and specifically, rolls. My Salted Honey Parker House Rolls are an iconic staple on this site. But I also love these French Onion Rolls and Everything Parker House Rolls.
Each of these recipes offers a different flavor profile; you just have to decide which one you’re in the mood for.
Ingredients for Garlic Dinner Rolls
- Instant Yeast – You can absolutely use dry active yeast if you like. You’ll just have to activate it in the milk with a bit of sugar. I like using instant yeast because it’s easier to handle.
- Garlic – We’re grating this garlic into some softened butter.
- Butter – This is essential for getting a delicious dough and filling.
- Eggs – This dough is very similar to my Salted Honey Parker House Rolls and it’s because that dough is delicious. The extra egg yolks result in a light and rich dough.
For the rest of the ingredients, please refer below to the recipe card!
How to Make these Garlic Dinner Rolls
- The first thing you’re going to do is butter your 9×13-inch baking pan. The butter helps to ensure the rolls don’t stick while infusing them with a little more buttery flavor.
- Next, you’ll mix the dry ingredients together. In this recipe, we have all-purpose flour, sugar, Instant Yeast, and kosher salt.
- In a small saucepan or pot, melt the butter with the milk over medium-low heat until the butter is melted. Make a well in the dry ingredients and pour the milk-butter mixture into the center, along with the beaten eggs.
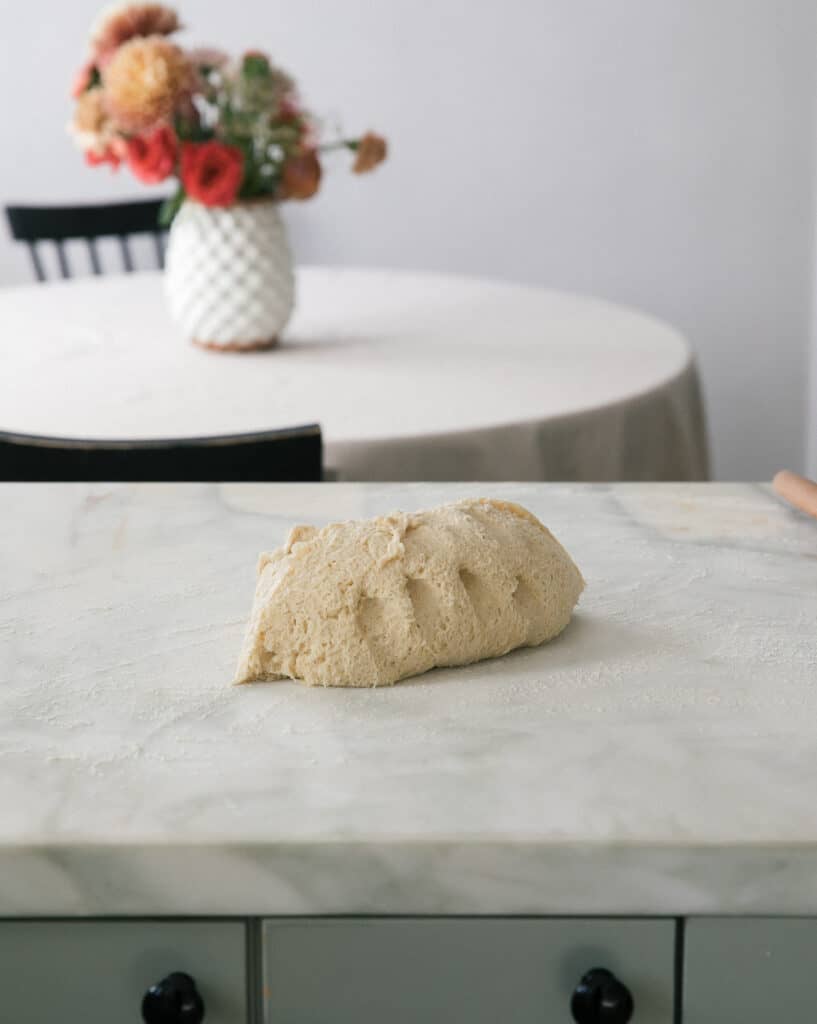
- Mix it all together and knead it for a few minutes in the bowl. And then add it to a floured surface and knead it a few more times until the dough is smooth and elastic.
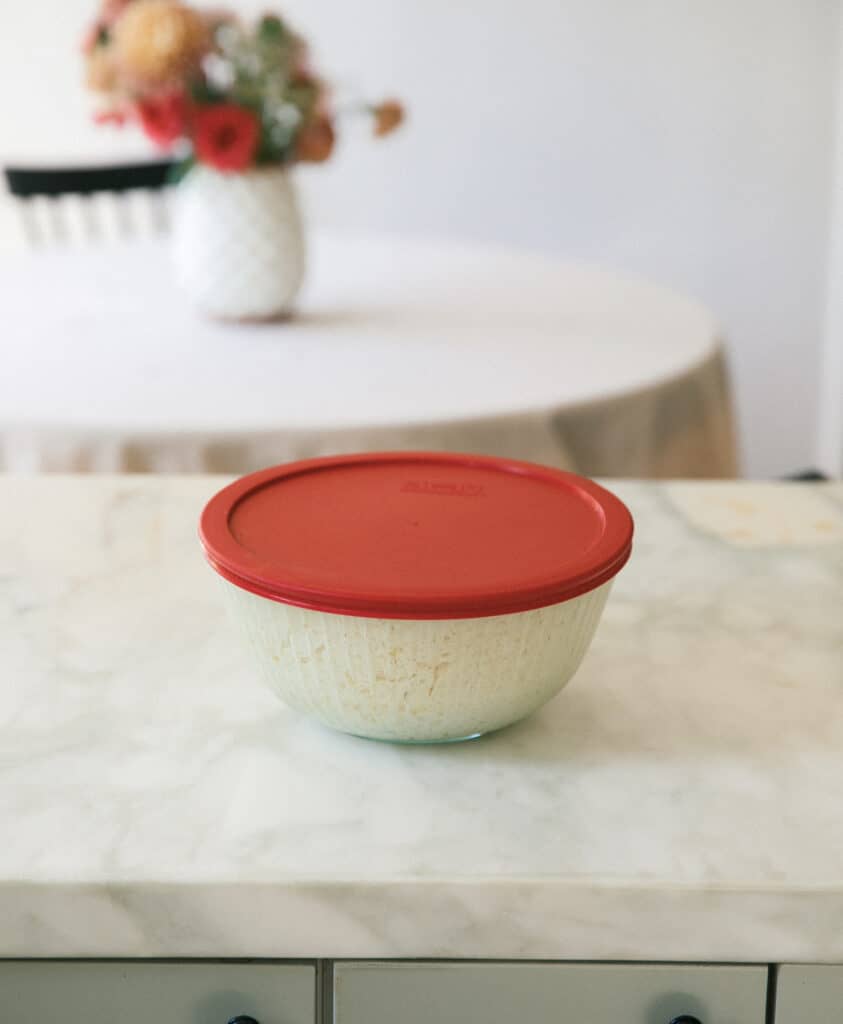
- Transfer it into a greased bowl. And allow the rolls to rise for about 30 to 40 minutes or until it’s doubled in size.
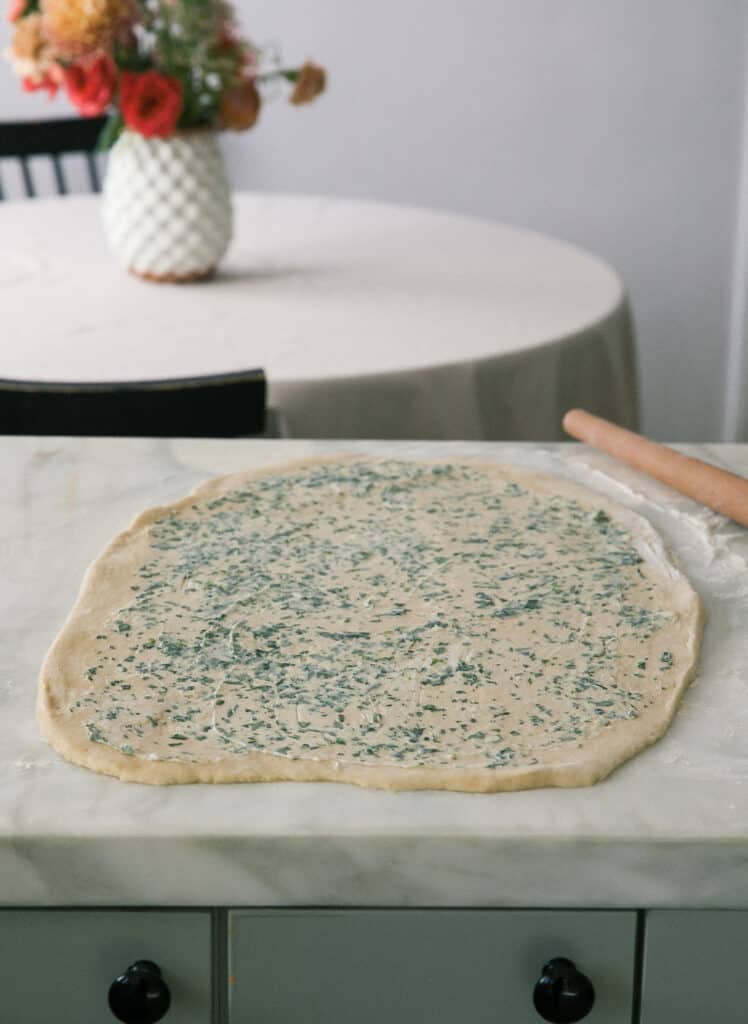
- Make the filling for the rolls by mixing softened butter, garlic, parsley, and kosher salt together in a small bowl with a fork.
How to Shape the Rolls
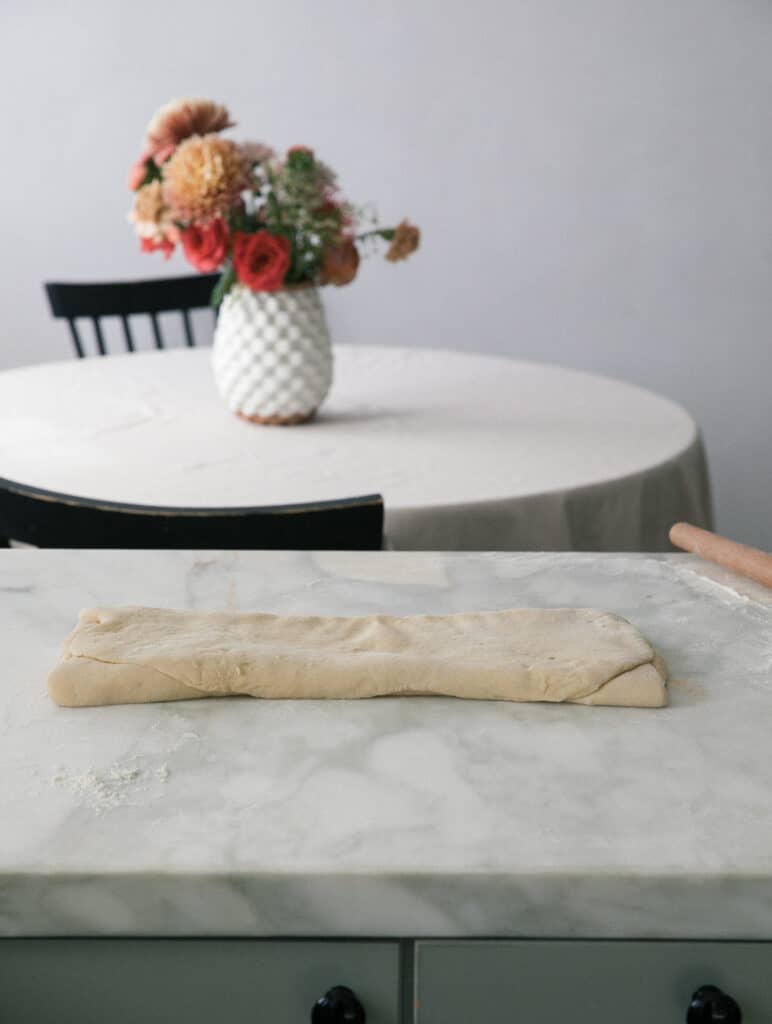
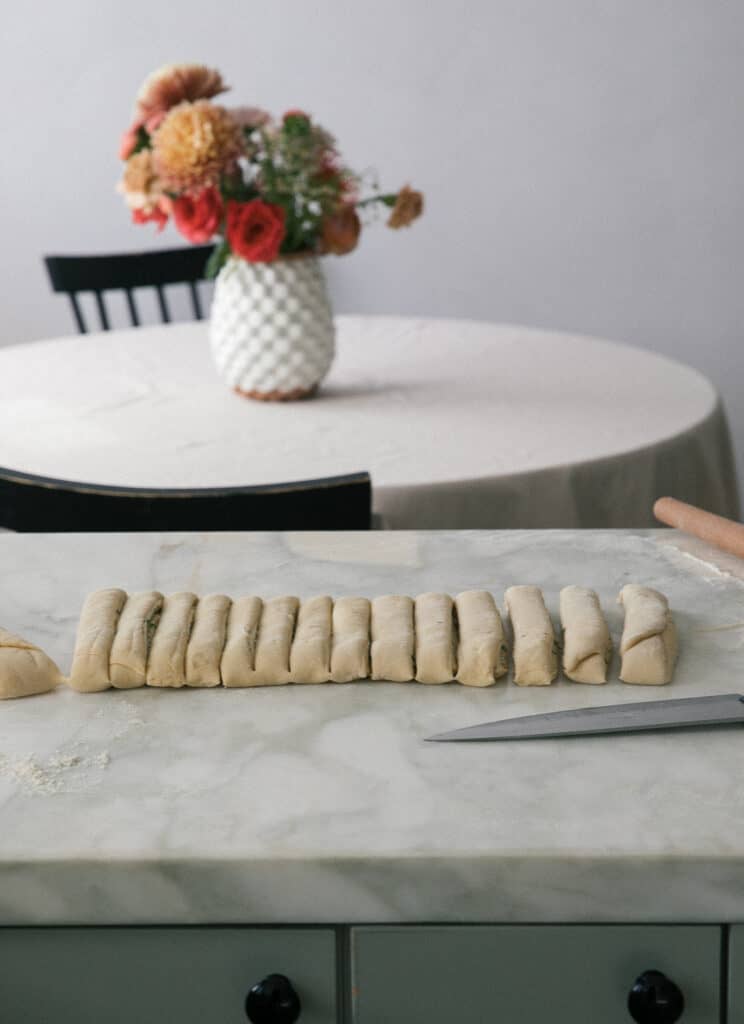
- To shape the rolls, you’re first going to roll the dough out to roughly 13-inches by 21-inches on a lightly floured, clean work surface. Then, you’ll evenly spread the filling out, edge to edge. Then, fold the dough like a letter in thirds and cut it into 15 even strips, making sure the widest part of your letter is horizontal.
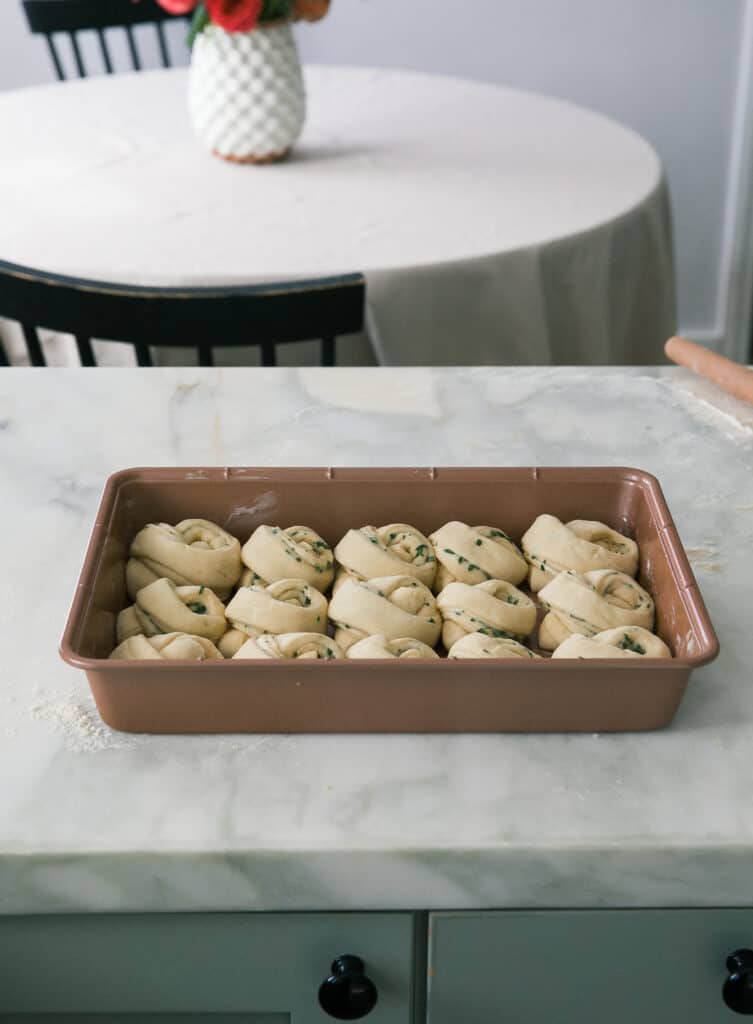
- Gently stretch each strip out before wrapping it one and a half times over your thumb and two fingers and then looping the remainder around the bunch and placing it in your pre-greased pan.
- Let them rise for 1 to 1 ½ hours or until they’ve doubled in size and are puffy.
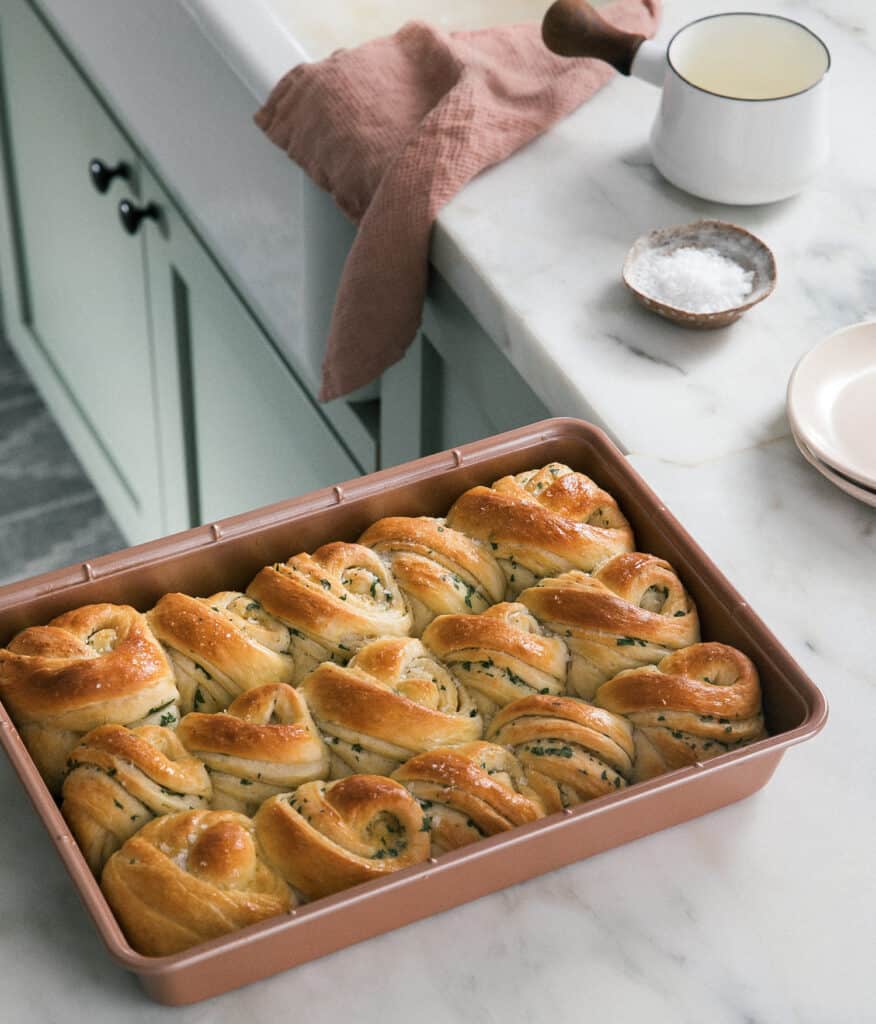
- Brush them with an egg wash and bake for about 20 minutes. After they’re out of the oven, brush ‘em with the melted butter and top them with flakey sea salt!
Tips and Tricks
- These rolls are best stored in a resealable plastic bag at room temperature.
- To rewarm them, wrap them in foil in a 200 degrees F oven for 10 minutes. You can serve them with softened butter or drizzle them with more melted butter before serving.
- If you don’t have flakey sea salt, you can top them with a pinch of kosher salt.
- If you don’t have instant yeast, you can use active dry yeast by adding the active dry yeast to the warm milk (don’t add the butter yet). Allow it to bloom and activate and get all foamy, about 10 minutes, then mix in the melted butter.
- If you’re not using the package of instant yeast and instead have a jar, you’ll be using 14 grams total of instant yeast. (Each envelope weighs 7 grams.)
- To make these ahead, you can make the dough the night before and let it rise in the fridge overnight. The following morning, divide and assemble the rolls, let them rise, and bake.
- And be sure to wrap the bowl tightly with plastic wrap if letting it rise in the fridge overnight or else the dough could form a crust. These are best the day of.
What to Serve with These Rolls:
- Zuni Cafe-Style Pollo a la Brasa
- Dark Chocolate Pecan Pie
- Miso Chocolate Chip Cookies
- Caramelized Shallot Dip
- Beet Pickled Deviled Eggs
If you tried this Garlic Dinner Rolls recipe or any other recipe on my website, please leave a 🌟 star rating and let me know how it went in the 📝 comments below. Thanks for visiting!
Garlic Dinner Rolls

Equipment
Ingredients
Dough:
- 1 tablespoon unsalted butter, (for the baking pan)
- 4 1/2 cups all-purpose flour, (562 g)
- 5 tablespoons sugar, (71 g)
- 2 envelopes Instant Yeast
- 2 teaspoons kosher salt
- 1 1/3 cup whole milk
- 1/4 cup unsalted butter, cubed
- 1 large egg
- 2 large egg yolks
Filling:
- 6 tablespoons unsalted butter, cubed and softened to room temperature
- 6 cloves garlic, grated
- ¼ cup fresh Italian parsley, finely chopped
- 1 teaspoon kosher salt
Topping:
- 1 large egg, (beaten, for egg wash topping)
- 2 tablespoons unsalted butter
- Flakey sea salt
Instructions
To Make the Dough:
- Butter a 9×13-inch baking pan or something comparable and set aside.
- *Note, this recipe uses a stand-up mixer but if you don’t have one, you can simply mix the ingredients together with a spatula and knead the dough by hand for about 10 minutes!
- In the bowl of a stand-up mixer (with the hook attachment), add the flour, sugar, yeast, and salt.
- Mix until combined. In a small pot, set over medium-low heat, warm the milk, butter, until butter is melted, being sure it’s not too hot (it should be lukewarm) or else the yeast won’t rise. If it does get a bit too hot, simply let it stand at room temperature until it cools down.
- Pour the liquid mixture into the dry ingredients. In a small bowl, add the egg and egg yolks and beat until combined. Next, add the egg mixture to the flour mixture and knead with the machine on medium speed for about 5-7 minutes, until smooth and elastic.
- The dough will be quite wet and that’s ok! Rub a medium bowl with about a teaspoon of oil, (I used olive oil), and transfer the dough to the bowl. Cover with a clean kitchen towel and allow to rise for 30-40 minutes. Alternatively, cover the bowl with a lid or plastic wrap and allow it to rise in the fridge for 12 to 24 hours.
To Make the Filling:
- Combine the softened butter, garlic, parsley, and kosher salt in a small bowl and use a fork to thoroughly mix. Set aside.
To Assemble the Rolls:
- Turn the dough out onto a clean work surface that has been lightly dusted with flour. Using a rolling pin, roll the dough into a roughly 13” x 21” rectangle.
- Spread the filling onto the rolled-out dough with a silicone spatula or offset spatula ensuring that it covers the surface from edge to edge.
- Fold the dough like a letter, folding the left side to the middle and then the right side over the left. Turn the dough so that the wide part is horizontal. If the dough is warm, transfer it to a baking sheet and chill it in the freezer for 20 minutes or until firm.
- When firm, cut the dough into 15 even strips, making sure the widest part is horizontal. Pull each strip longways to gently stretch each piece.
- Starting from the end, wrap one strand around the tips of your thumb and two or three fingers one and a half times then loop the strand around the bunch and place into the pregreased pan. Repeat with all strands.
- Allow them to rise for about 1 to 1 1/2 hours. They should have doubled in size and should be puffy and supple.
- *Note: if you let the dough rise in the fridge overnight, you can assemble them straight from the fridge but they may need to rise for a bit longer (since the dough will be quite cold). It may take about 1 1/2 hours for them to rise after being assembled!
- Preheat the oven to 350 degrees F. Brush the tops of the rolls with egg wash and transfer to the oven to bake until golden brown, about 20 minutes.
To Garnish:
- When the buns come out of the oven, immediately brush the tops with the butter mixture and sprinkle with flakey sea salt.
Notes
- You can store these rolls in a sealable plastic bag and store them at room temperature.
- To rewarm them, wrap them in foil in a 200 degrees F oven for 10 minutes. You can serve them with softened butter.
- If you don’t have flakey sea salt, feel free to top them with a pinch of kosher salt.
- If you don’t have instant yeast, you can use active dry yeast by adding the active dry yeast to the warm milk and honey mixture (don’t add the butter yet). Allow it to bloom and activate and get all foamy, about 10 minutes, then mix in the melted butter.
- If you’re not using the package of instant yeast and instead have a jar, you’ll be using 14 grams total of instant yeast. (Each envelope weighs 7 grams.)
- To make these ahead, you can make the dough the night before and let it rise in the fridge overnight. The following morning, divide and assemble the rolls, let them rise and bake.
- Rub the surface of the dough with a bit of olive oil or cooking oil so as to avoid a crust from forming on the top of the rolls
- And be sure to wrap the bowl tightly with plastic wrap if letting it rise in the fridge overnight or else the dough could form a crust. These are best the day of.
Nutrition
Nutrition information is automatically calculated, so should only be used as an approximation.


Making these for Thanksgiving dinner today. Rolls are assembled and in their second rise. Wish me luck!
Amazing report back! 🙂
Thank you for sharing your recipe. So delicious!
I have another question;
URGENT:
What is 2 envelopes of instant yeast equivalent in tablespoons/teaspoons. We don’t have “envelopes” of instant dry yeast, just a big pack of it.
1 tablespoon!
Not it is not. Each envelope is 1 Tbsp so 2 envelopes is 2 Tbsp.
An envelope of yeast is 1¼ teaspoons, so this recipe calls for 2½ teaspoons of yeast. I’ve made it at least 3 times now with that measurement and it works for me
URGENT:
Can i refrigerate the (already) rolled and divided garlic dinner rolls dough overnight? Or will it deflate?
We’ll be making them on sunday and pass it to our teacher the next day, monday. Should we already bake it ,and just reheat it. Or refrigerate them overnight? We don’t have the luxury to roll the dough the next day so we’ll already be rolling them the same day.
Thank you so much, I’ll be making this for a project at school. They look delicious btw, i hope they taste like it too:))
Hi! Yes, you definitely can refrigerate it. Just wrap the 9×13-inch baking dish in plastic wrap. And put it in the fridge. Then Monday remove it from the fridge and let it rise (if it hasn’t risen much in the fridge) and come to room temperature (about 1 hour to 1 1/2 hr). And then proceed with baking!
Alternatively, you can always bake them the night before and just reheat them.
Oh alright, thank you so much !!
These were AMAZING! I added about 1/4 cup of finely shredded mozzarella and 1 tablespoon grated Parmesan to the filling. I also doubled the butter that was brushed on top. So soft and delicious! I can’t wait to share them with my family at the Super Bowl party I’m going to.
this sounds so delicious!!
Excellent rolls! I made these with my son for Thanksgiving again this year. I still don’t have the shaping of the rolls down 100% but I think with practice I can get it. I have been finely chopping the garlic, which my family is ok with (my 8 yr old son likes the bits) but the grated garlic as per the recipe would be better, less intense. The texture and flavor of the rolls are great. Soft, easy to pull apart. You open them up and the smell and flavor of the garlic, butter and parsley is divine. A subtle sweetness is there too. These are incredible rolls that are worth the time and effort. Little hands can help mix and spread the filling. Oh and you can eat them the next day. Still fresh and enjoyable with leftovers. Thanks for a yummy new tradition!
I just made these and i love how they turned out. My house smells great. The garlic knot are soft and so flavorful.
wonderful!!
These rolls are truly fabulous. I made them for thanksgiving and someone commented that they are the best rolls they have ever had. The twisting took me a bit to figure out but I read the directions multiples times and practiced. Highly recommend.
Can bread flour be used?
for the best result, i would stick with all-purpose since that’s how the recipe was developed!
I think I could use more instruction on how to shape these rolls. I just can picture it.
I basically tied them in a knot.
I held one end of the dough strip with my thumb and 3 fingers. Then I held the other end with my right hand and wrapped it around the fingers of my left hand once. I tucked the remaining dough that I was holding with my right hand under the center of the dough held in my left hand.
I wiggled the left hand out of the dough knot and continued to tuck the end of the strand through the bread until it came almost through the top. That extra tuck kind of turns the roll inside out and reveals the layers of dough and buttery filling.
I hope that helps!