Disclosure: This post may contain affiliate links, which means I may earn a commission if you click on the link and make a purchase.
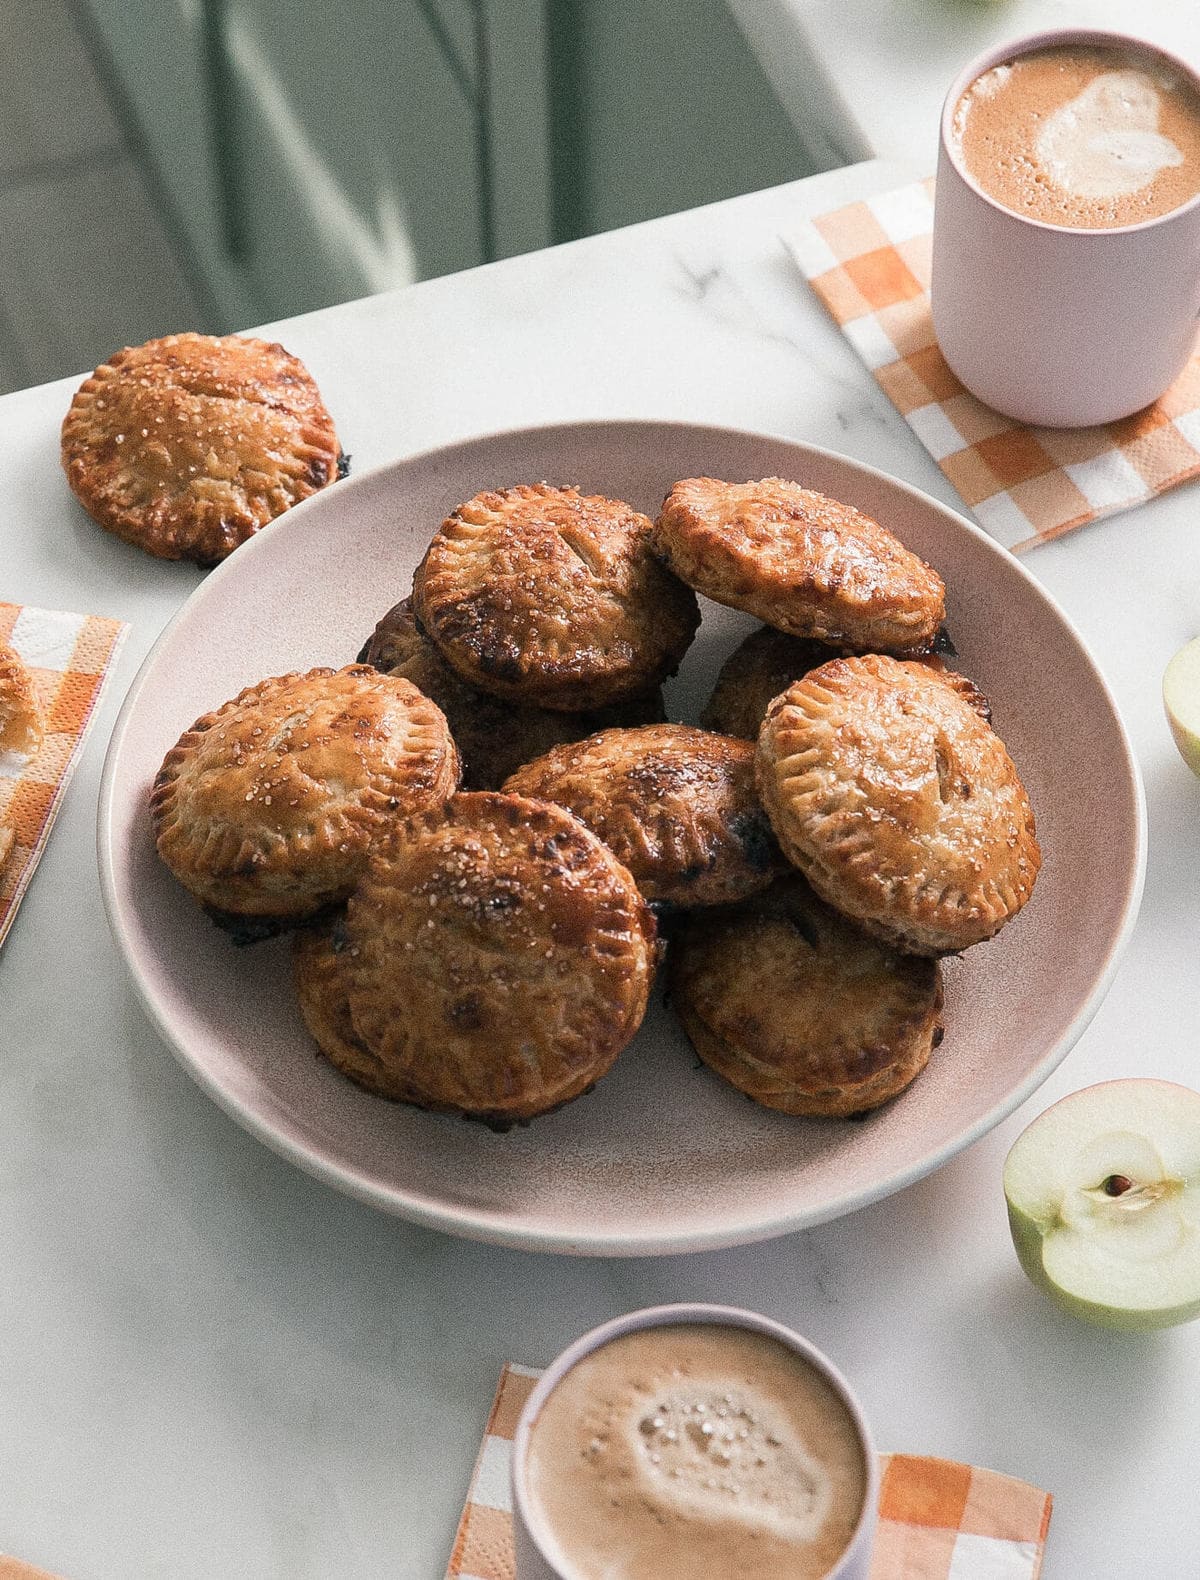
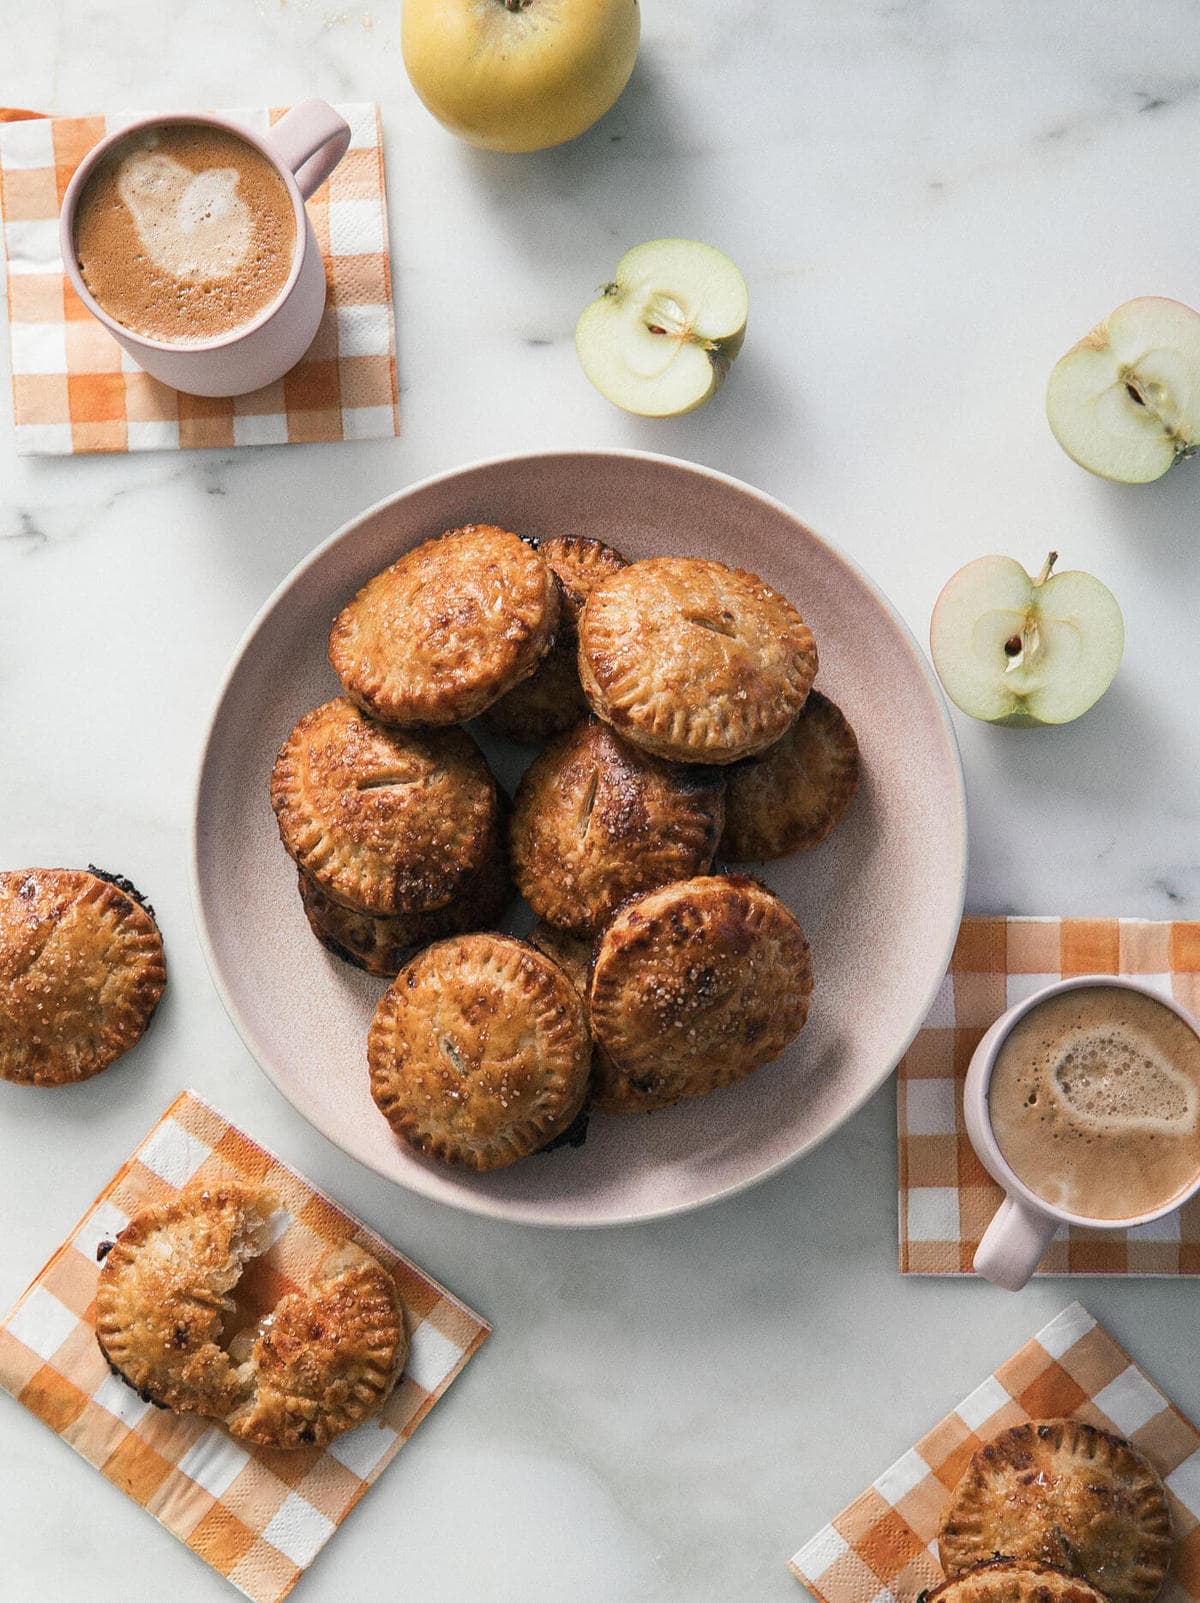
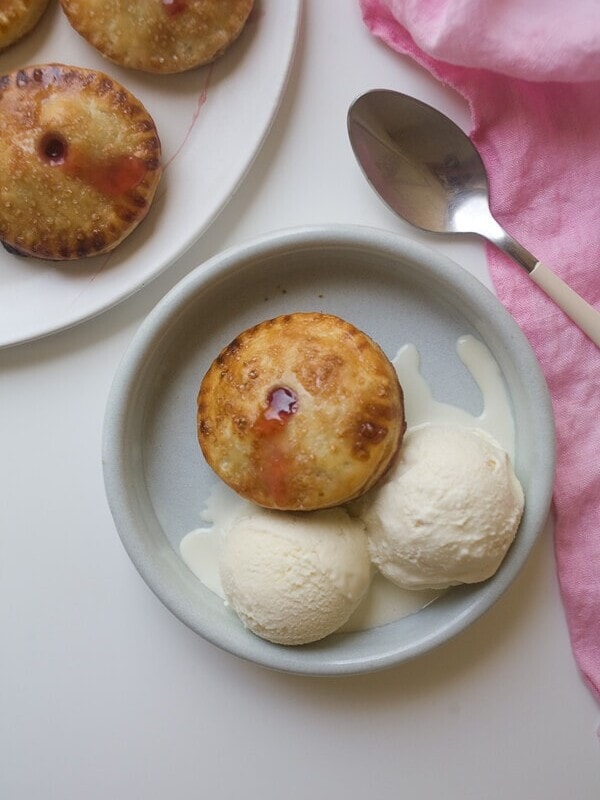
These Cheddar Rye Apple Hand Pies are cozy pockets of delicious goodness! A flaky all-butter pie crust is mixed with aged cheddar cheese then stuffed with a warm, spiced apple filling. This must-have fall dessert is sweet and savory and easy to make ahead of time. They are delicious for breakfast with a cup of coffee or enjoyed as an after dinner treat served with Chicken Tortilla Soup.

Hand pies are so fun and delicious. Similar to my Apple Hand Pies, Sour Cherry Hand Pies and Banana Hand Pies, these cheddar rye apple hand pies are not only adorable but super easy to make for parties or easy breakfasts.
Ingredients You’ll Need for Cheddar Rye Apple Hand Pies

- Flour – You can use a mix of rye flour and white flour or simply all-purpose flour.
- Butter – You’ll need 3 sticks or 1 1/2 cups of really cold butter. European-style butter has a higher fat content and a richer flavor but regular butter is perfectly fine!
- Cheddar cheese – White cheddar or regular yellow cheddar. If you want a sharp and nutty flavor in your crust make sure it’s “aged” so the flavor will come through after it’s baked.
- Apples – You only need 2 medium apples to make 24 hand pies, since each pie is only getting 1 teaspoon of apple filling. Any sweet and tart apple will do here, Honey crisp, Northern Spy, or Golden Delicious.
For the rest of the ingredients, please refer to the recipe index card below!
How To Make Cheddar Rye Apple Hand Pies
- Make the cheddar pie crust – In a large stainless steel bowl combine flour, sugar, and salt. Grate the butter into the flour mixture. Transfer the mixture to the freezer for 5 minutes, then mix the butter into the flour mixture, breaking it into small bits using your hands until it’s the size of peas. Finally mix in the grated cheddar cheese.
- Pour the water-vinegar mixture to the flour mixture stirring with a spoon until there isn’t any visible pools of liquid. Use the tips of your hands to squeeze and fold the dough in the bowl, quarter turn the bowl then repeat. Work quickly to create a cohesive mass of dough.
- Transfer dough to a lightly floured counter, divide into 2 pieces then gently pat into 1-inch thick squares, wrap tightly in plastic wrap then refrigerate for at least 2 hours.
- Make the apple filling – To a large bowl combine, cubed apples with lemon juice, both sugars, tapioca starch, ground cinnamon, nutmeg and salt. Toss to combine.
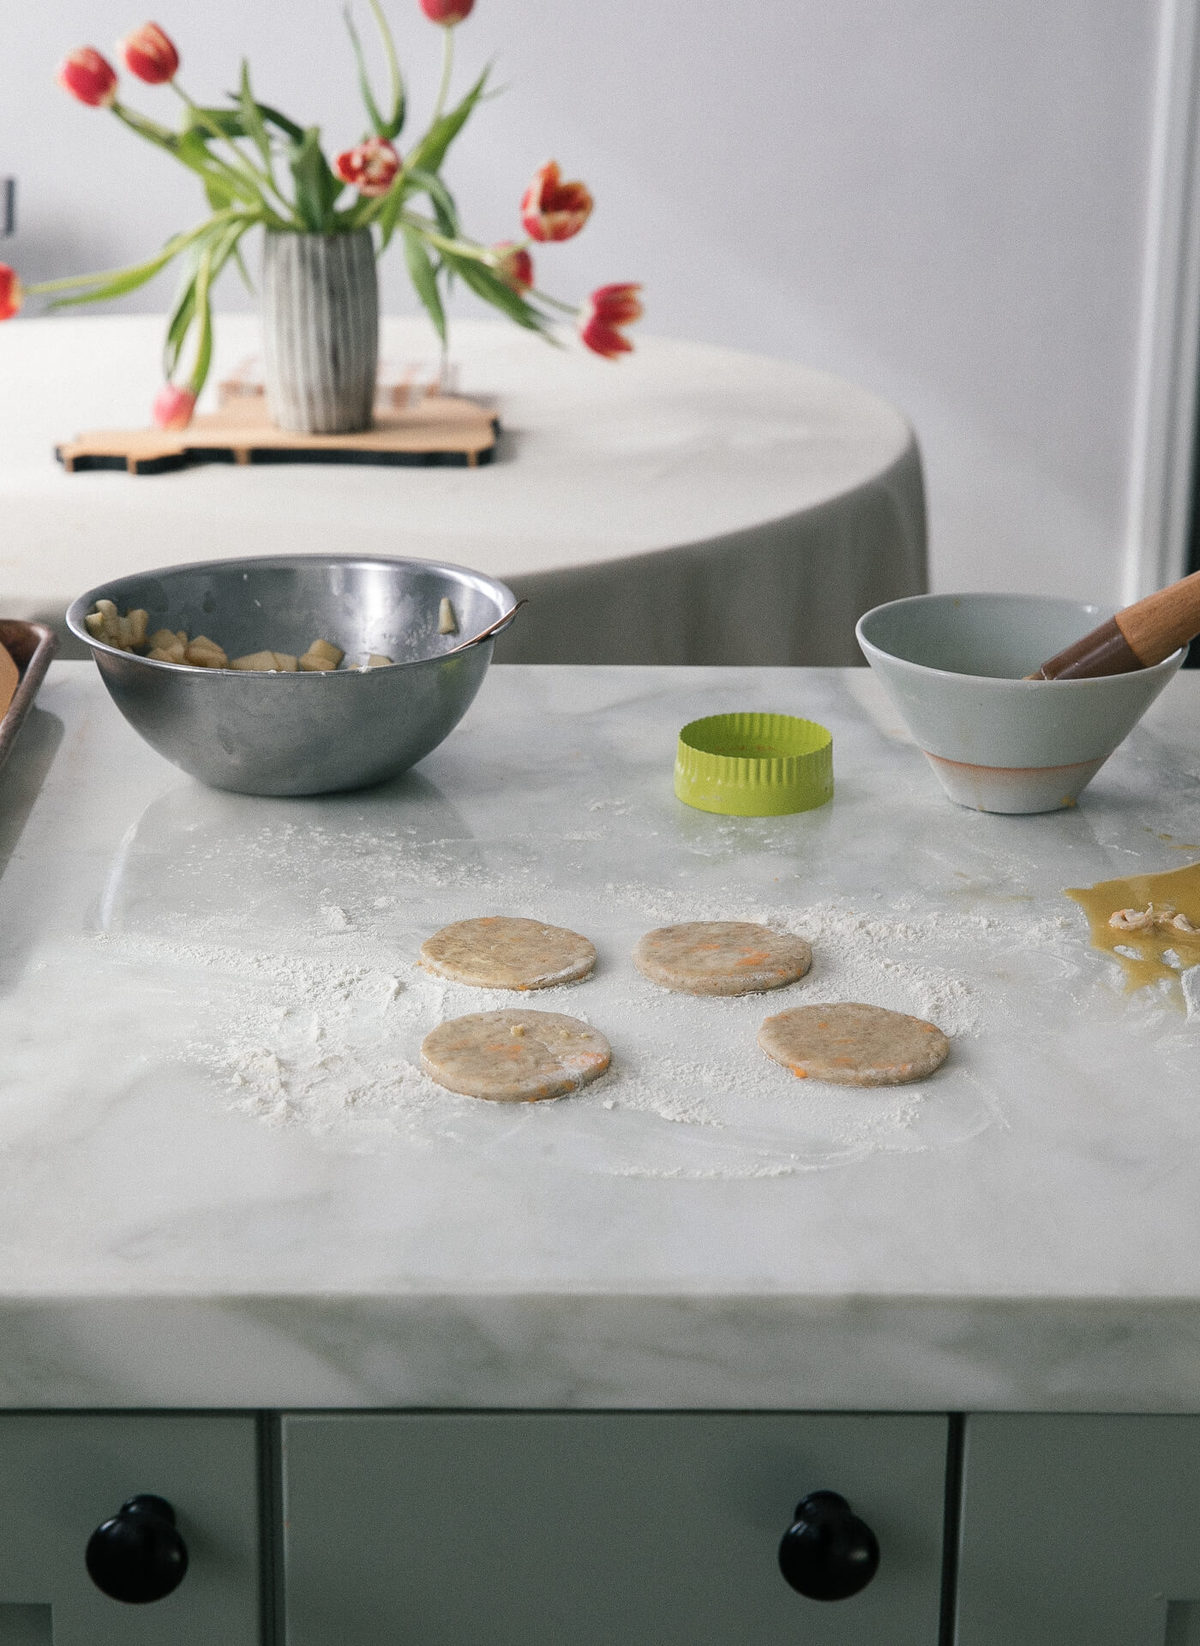
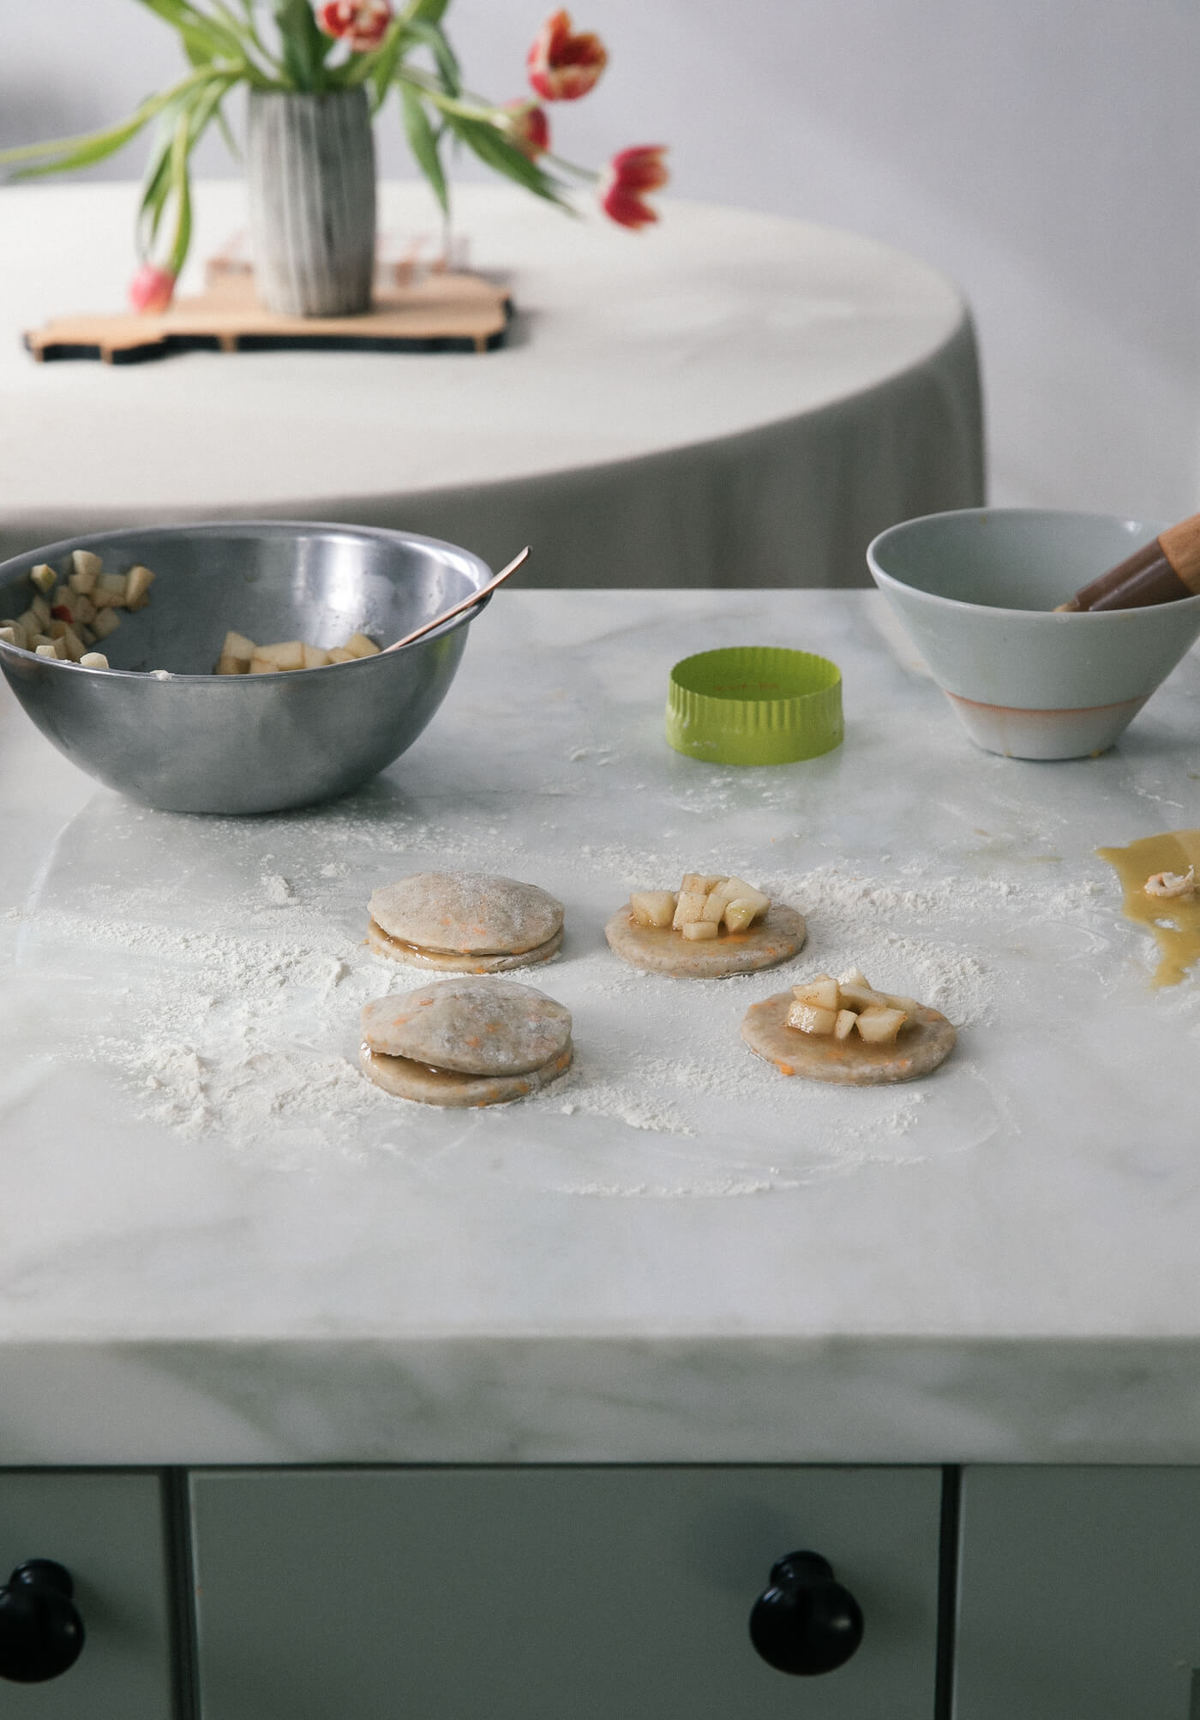
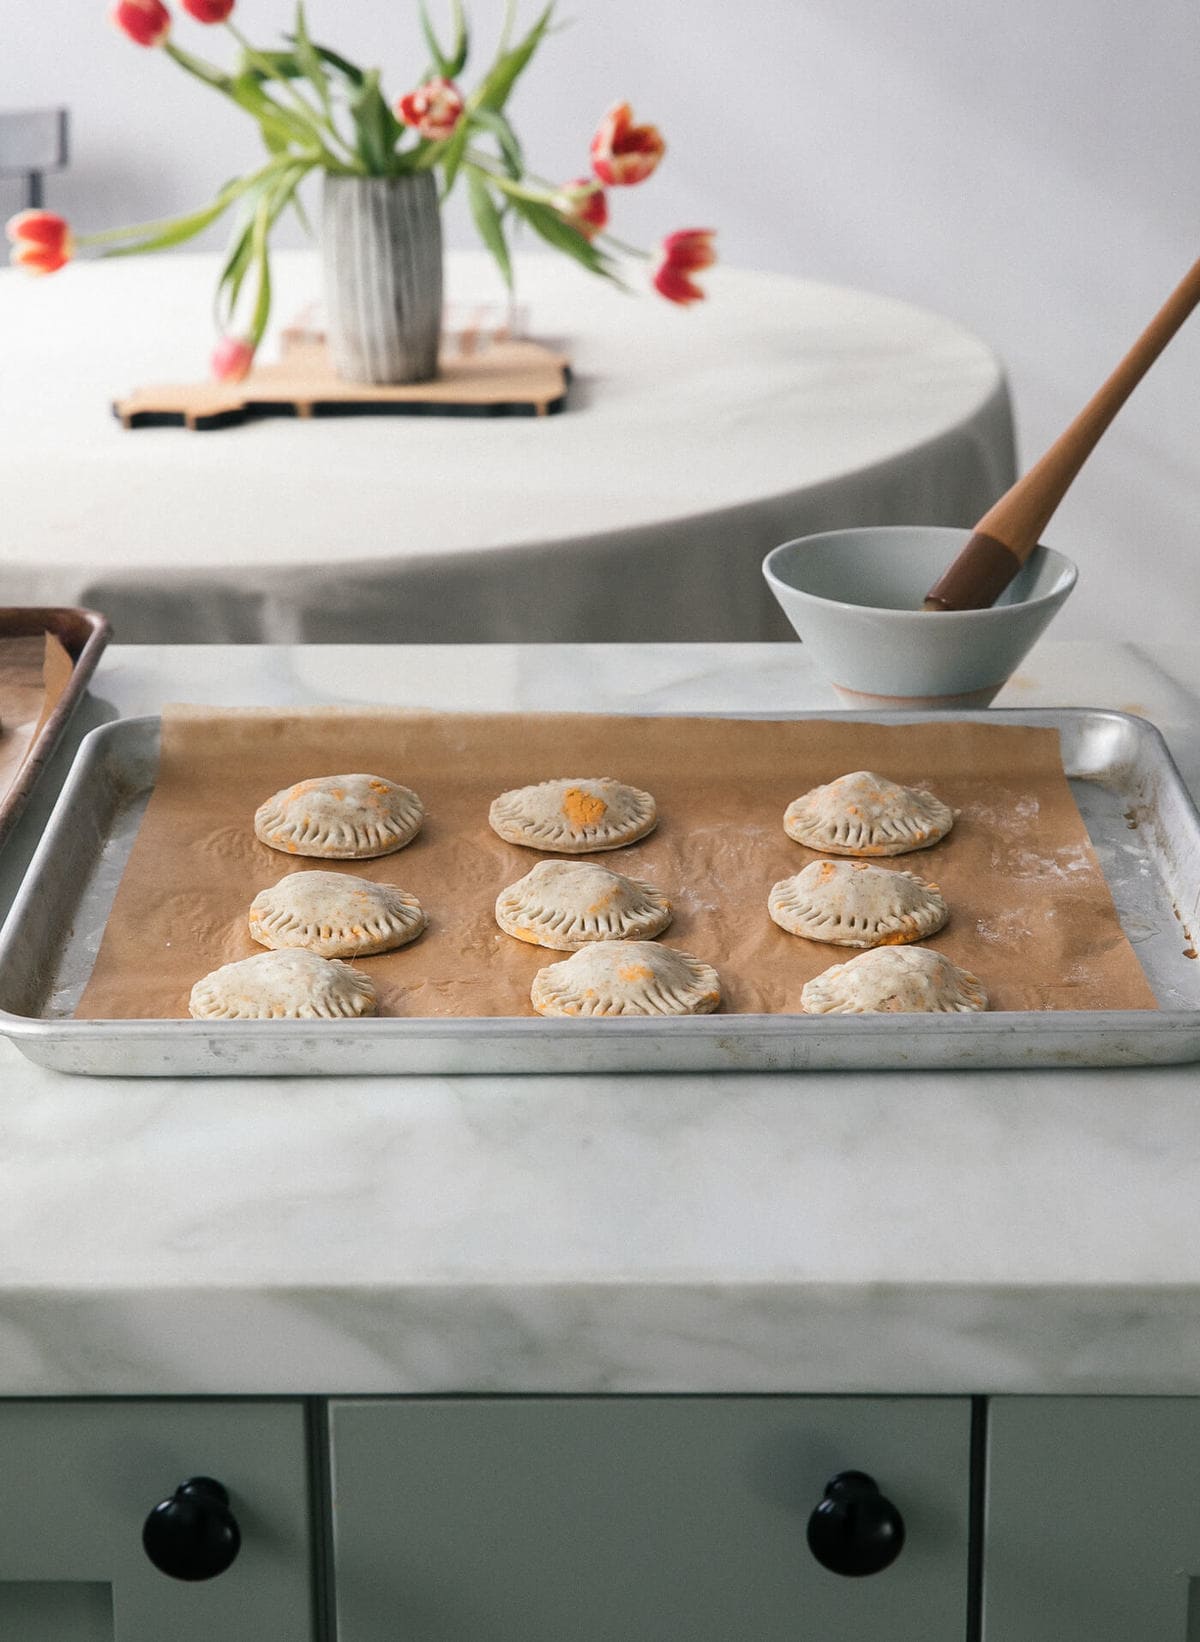
- Assemble – Roll out the dough on a lightly floured counter until it’s 1/2-inch thick. Use a 3-inch or 4-inch round cookie cutter to stamp out the pie crust then transfer the rounds to a baking sheet. Place into the freezer to firm up for 10 minutes. Brush rounds with beaten egg then add a heaping teaspoon of diced apple to the center leaving a 1-inch border. Place the top crust over the apples then press the edges together using the tines of a fork. Transfer the hand pies to the freezer once again for another 10 minutes.
- Bake – Preheat the oven to 425 degrees Fahrenheit. Brush the tops with more egg and a sprinkle of turbinado sugar then bake in a preheated oven for 15 – 20 minutes or until the tops are golden brown.
Tips and Tricks
- Grate the butter – I find that this method works better than using a pastry cutter and you don’t need to buy any special tools. Just use a regular cheese grater to grate the butter.
- Keep the pie crust as cold as possible – Throughout the rolling and assembly process I will pop the pie crust into the freezer multiple times to ensure that the butter doesn’t become too warm which will lead to a tough dough. Keeping the crust as cold as possible will lead to a light and flaky crust.
- Ice cold water and vinegar – The water should be very cold so it doesn’t warm up the butter making the crust tough and chewy. Vinegar(I used apple cider vinegar but white vinegar is fine too) slows the gluten development when folding the dough, keeping the crust tender, light and flaky when it bakes.
- Prep the pie dough ahead of time – It’s best to make the cheddar pie crust at least 2 hours (but ideally overnight) before you are ready to bake them. The dough can last in the fridge for 2 – 3 days or in the freezer for up to 1 year. Thaw from the freezer by placing the dough in the refrigerator 1 day before you are ready to use it.
- Assemble hand pies then bake later – Transfer assembled hand pies to a baking sheet and place in the freezer. When frozen, place in a freezer storage bag and freeze for up to 3 months. Transfer from the freezer directly to the oven to bake.
Recipe FAQs
You probably added too much filling to your hand pies or didn’t crimp the edges tight enough. Hand pies are really small so you’ll need less filling than you might think. A heaping teaspoon of filling is more than enough. For the edges, I like to crimp them with a fork then use a cookie cutter to seal/ clean up the edges.
Aged cheddar has such a bold and strong flavor that it adds an amazing savory note to pie crust. It works so well in both savory and sweet recipes giving it an extra pop of flavor!

More Fall Recipes

Holiday
Apple Cinnamon Rolls
Desserts
Sour Cherry Hand Pies

Desserts
Banana Hand Pies

Desserts
Apple Cheese Danish
If you tried this Cheddar Rye Apple Hand Pies Recipe or any other recipe on my website, please leave a 🌟 star rating and let me know how it went in the 📝 comments below. Thanks for visiting!
Cheddar Rye Apple Hand Pies

Equipment
- 1 large stainless steel bowl
- 1 cheese grater used for the butter and the cheese
- 1 Rolling Pin
- 1(3-inch or 4-inch) round cookie cutter
- 2 Baking Sheets
- 1 pastry brush
Ingredients
Cheddar Pie Crust:
- 1/2 cup + 2 tablespoons ice cold water
- 2 tablespoons apple cider vinegar
- 3 3/4 cups all-purpose flour
- 1 1/2 teaspoons granulated sugar
- 1 1/2 teaspoons kosher salt
- 1 1/2 cups 3 sticks unsalted butter, straight from the fridge (They recommend European-style butter, I just regular!)
- 2 ounces aged Cheddar cheese, grated
Apple Filling:
- 2 Northern Spy, Idared, Golden Delicious or Honey Crisp apples, peeled, cored and diced
- 1/2 teaspoon freshly squeezed lemon juice, about 1/4 lemon
- 1/4 cup granulated sugar
- 2 tablespoons packed light brown sugar
- 2 tablespoons tapioca starch or 1 tablespoon corn starch
- 1/8 teaspoon ground cinnamon
- 1/8 teaspoon ground nutmeg
Instructions
To Make the Cheddar Pie Crust:
- In a large stainless steel bowl, combine the all-purpose flour, sugar, and salt and stir to mix well. I am a firm follower of the grating butter method. They recommend a pastry cutter, but I don’t own one, so I recommend grating the butter, using a cheese grater, into the dry ingredient mixture. Transfer to the freezer to chill for about 5 minutes. Mix the butter into the flour mixture, until throughly combined, breaking up the butter bits until they resemble the size of peas. The rest of the pie dough should look like canned Parmesan cheese. Speaking of cheese, now is the time to add the Cheddar and mix in quickly until evenly distributed.
- At this point, add the water-vinegar mixture all at once, and give it a good mix. I like to use a spoon for this part. Scrape as much of the mixture as you can from one side of the bowl to the other, until you can’t see visible pools of liquid anymore. Now it’s hand time. Scoop up as much of the mixture as you can, and use the tips of your fingers (and a whole lot of pressure) to press it back down onto the rest of the ingredients. Rotate the bowl a quarter-turn and repeat. Scoop, press and turn. With each fold, your intentions is to be quickly forming the mixture into one cohesive mass.
- Remove the dough from the bowl, place it on a lightly-floured counter, and use your bench scraper to divide into two equal pieces. Gently pat each into a 1-inch thick square, working quickly to seal any broken edges before wrapping them tightly in a double layer of plastic wrap. Refrigerate the dough for at least 2 hours, or, ideally, overnight.
- You can keep the pie dough in the fridge for a few days or in the freezer for up to 1 year. If frozen, remove the dough and place tin the refrigerator to thaw one full day before you intend to use it.
To Make the Apple Filling:
- Place the cubed apples in a large bowl and toss with a the lemon juice. Add the granulated sugar, brown sugar, tapioca or corn starch, cinnamon, nutmeg, and salt. Toss until evenly distributed.
- Remove the first disk of dough from the fridge. Lightly flour your work surface and roll the dough out to a 1/2-inch thick round. Using a 3-inch or 4-inch round cookie cutter, stamp out rounds of pie crust and transfer them to a baking sheet or tray. You should be able to re roll the scraps and end up with about 40 rounds.
- I stuck them in the freezer for about 10 minutes just to firm up a bit. Remove the rolled-out pie crust from the fridge or freezer and lay half of them out onto a lightly floured surface. Brush each round entirely with beaten egg. Add a heaping teaspoon of the diced apples to the center of each round, leaving at least a 1-inch border.
- Using the tines of a fork (dipped in flour), press the edges together and do this around the edge of the entire round, making a decorative edge. Take the 3-inch or 4-inch cutter (whichever one you used) and cut the hand pie once more to clean and define the edges. Repeat with the remaining hand pies.
- Transfer them to the freezer to chill for about 10 minutes. Meanwhile preheat the oven to 450 degrees F.
- When the hand pies are done chilling and the oven is preheated, brush the tops with the remaining egg wash and sprinkle with turbinado sugar. Transfer to the oven (I did this in batches) for about 15 to 20 minutes, until the tops are golden brown.
Notes
Tips and Tricks
- Grate the butter – I find that this method works better than using a pastry cutter and you don’t need to buy any special tools. Just use a regular cheese grater to grate the butter.
- Keep the pie crust as cold as possible – Throughout the rolling and assembly process I will pop the pie crust into the freezer multiple times to ensure that the butter doesn’t become too warm which will lead to a tough dough. Keeping the crust as cold as possible will lead to a light and flaky crust.
- Ice cold water and vinegar – The water should be very cold so it doesn’t warm up the butter making the crust tough and chewy. Vinegar(I used apple cider vinegar but white vinegar is fine too) slows the gluten development when folding the dough, keeping the crust tender, light and flaky when it bakes.
- Prep the pie dough ahead of time – It’s best to make the cheddar pie crust at least 2 hours (but ideally overnight) before you are ready to bake them. The dough can last in the fridge for 2 – 3 days or in the freezer for up to 1 year. Thaw from the freezer by placing the dough in the refrigerator 1 day before you are ready to use it.
- Assemble hand pies then bake later – Transfer assembled hand pies to a baking sheet and place in the freezer. When frozen, place in a freezer storage bag and freeze for up to 3 months. Transfer from the freezer directly to the oven to bake.
Nutrition
Nutrition information is automatically calculated, so should only be used as an approximation.


Where is the “Rye” part??
This recipe sounds amazing and I absolutely love the technique for making this dough – it was quick and nice and moist.
It’s in the fridge now and I can’t wait to roll out.
But…1/2″ thick dough -am I reading that correctly? Please confirm!
yes you could roll it to 1/4 inch thick if you like.