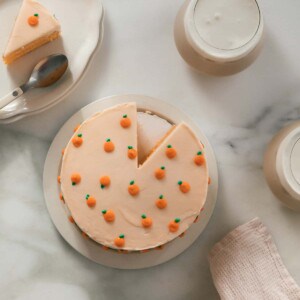
Creamsicle Cake
This creamsicle cake tastes like all of our childhood ice cream dreams but in cake form. A strong orange and cream and vanilla flavor are found throughout. And the texture of the cake is fluffy and delicious.
Servings: 8
Cost: $12
Ingredients
Creamsicle Cake:
- 3 (390g) cups all-purpose flour
- 2 1/2 teaspoons baking powder
- 1 teaspoon kosher salt
- 2 1/2 (500g) cups granulated sugar
- 1/4 cup orange zest (from about 4 oranges)
- 1/2 cup unsalted butter at room temperature
- 1/3 cup neutral oil
- 1 tablespoon pure vanilla extract
- 2 drops orange food coloring gel (optional)
- 1/3 cup milk
- 6 large egg whites
- 1/2 cup orange juice (from about 4 oranges), strained to remove pulp and seeds
Buttercream Frosting:
- 12 (336g) ounces cream cheese at room temperature
- 3/4 (170g) cup unsalted butter at room temperature
- 1 pod vanilla bean scraped OR 2 teaspoons pure vanilla extract
- 5 cups powdered sugar (plus more for the decoration)
- 2 tablespoons heavy cream
Orange Decoration:
- Orange food coloring gel
- Green food coloring gel
Instructions
To Make the Creamsicle Cake:
- Preheat oven to 350F. Grease two or three 8-inch cake pans.
- In a medium bowl, whisk together the flour, baking powder and salt. Set aside.
- In the bowl of a stand-up mixer with the paddle attachment (alternatively you can do this in a large bowl with an electric mixer), add the sugar and orange zest. Beat the two together. This will release all of the fragrant oils in the orange zest and infuse them in the sugar. We want this, we need this. Add the butter and vanilla extract; beat until light and fluffy, about 2 to 3 minutes. If you want the cake to be orange in color, add 2 drops of food coloring gel. This is of course optional. Pour in the oil and beat once more.
- In a measuring cup, pour in the milk, egg whites, and add the strained orange juice; whisk together.
- Turn the mixer to low speed and, alternating between the dry ingredients and the liquid ingredients, add them to the butter/sugar mixture, until the batter is relatively smooth.
- Divide the batter amongst the two or three prepared baking pans and smooth it out until it reaches the sides. Transfer to the oven to bake for 20 to 22 minutes, until a skewer inserted into the center comes out clean.
- Allow the cake layers to cool in their pans for about 10 minutes and then invert onto a cooling rack and cool to room temperature. It’ll probably take a good hour.
To Make the Buttercream Frosting:
- In the bowl of a stand-up mixer with the paddle attachment (or a medium bowl using an electric hand mixer), add the cream cheese and beat until smooth. Then add the butter and beat for about 10 seconds. This will just smooth everything out.
- Add the powdered sugar, salt, vanilla and heavy cream. Beat for a full 2 minutes to ensure fluffy, delicious frosting.
To Make the Orange for Decoration:
- To two bowls, add about 1/4 cup of frosting to each. You can eyeball this. One will be our orange and another will be our stems (green). Add a drop or two of orange food coloring to one frosting bowl. And add a drop or two of green food coloring gel to the second frosting bowl. Mix until smooth. Transfer the orange frosting to a piping bag fitted with a #3 round piping tip.
- Transfer the green frosting to a piping bag fitted with a #1 round piping tip.
To Decorate the Cake:
- Add the frosting to the top of the cake and smooth it out into an even layer. Make it cute with some swoops.
- If you didn’t do the oranges above, no biggie. Top it with some sprinkles OR leave it as is. It’s cute.
- To add the oranges, pipe on rounds of frosting; they’ll end up looking like oranges once we add the tops. Add as many as you like. Make them any size you like, too. Dip your finger in a bit of water and tap the tops of the oranges to make them appear smoother.
- Pipe on a “leaf" shape at the top of each of the oranges. This will make it appear like they have a stem.
To Store Cake:
- I keep this cake at room temperature on my counter. I don’t own a glass cake cover so I use a colander. This cake is delicious for about 2 to 3 days. If my way leaves you unsettled, you can always place the cake on a large plate or baking dish and cover it with plastic wrap. You can also place slices in containers with lids and just store them at room temperature.
Video
Notes
Equipment:
(2) 8-inch round cake pans | KitchenAid Stand Mixer | Oxo Measuring Cups | OXO Measuring Spoons | Digital Food Scale | Piping Tip Kit |
Nutrition
Serving: 12g | Calories: 231kcal | Carbohydrates: 32g | Protein: 32g | Fat: 3g | Saturated Fat: 4g | Trans Fat: 11g | Cholesterol: 32mg | Sodium: 5mg | Potassium: 53mg | Fiber: 2g | Sugar: 12g | Vitamin A: 32IU | Vitamin C: 5mg | Calcium: 32mg | Iron: 1mg
